JupyterHub
JupyterHub is ideal to enable multiple users easily start predefined workspaces in the same project.
Configuring and deploying JupyterHub can be a bit tricky. Feel free to submit a ticket to ask for help.
Downloading and adjusting the config-basic.yaml
Download the preconfigured config-basic.yaml from our GitHub repository.
The default config that is provided by JupyterHub will not work.
Setting user's default persistent volume size
Persistent volumes
Persistent volumes are automatically created for each user and instance started in JupyterHub to ensure persistence of the data even if JupyterHub is stopped. You can find the persistent volumes in the DSRI web UI, go to the Administrator view > Storage > Persistent Volume Claims.
It is possible to change the default size of a persistent volume claim for a user in the config-basic.yaml. In our config-basic.yaml the default value is 2Gi. However if you think that your users will need more storage space you can change this default size in the config-basic.yaml.
singleuser:
  # ...
  storage:
    capacity: 2Gi
Configuring an authentication method
At the moment we support three different authentication methods. One for testing purposes (dummy authentication), one for people who are working alone in a JupyterHub instance or with one or two collaborators (allowed_users / admin_users authentication), and one for allowing groups of people to collaborate in the same JupyterHub instance (GitHub OAuth). By default the dummy authentication is set in the config-basic.yaml. Note that this is only for testing purposes!!! However, with very few changes to the config-basic.yaml you can set up the other authentication methods. For reference see the zero2jupyterhub documentation about authentication methods
Dummy authentication
This authentication method is set by default and is only there so that you can easily test your JupyterHub instance without the need of setting up proper authentication. The catch with this method is that whatever username/password combination you fill in, you will get access! In other words this is completely not safe to use in use cases other than testing!
In the config-basic.yaml you see -besides the commented out other authentication methods- the following block of text:
hub:
  # ...
  config:
    JupyterHub:
      admin_access: true
      authenticator_class: dummy
Some parts are intentionally left out here, shown as dots # ... for better representation. If you are first setting up your JupyterHub instance you can leave this as is. Upon going to your instance via the URL you will get prompted with a login screen:
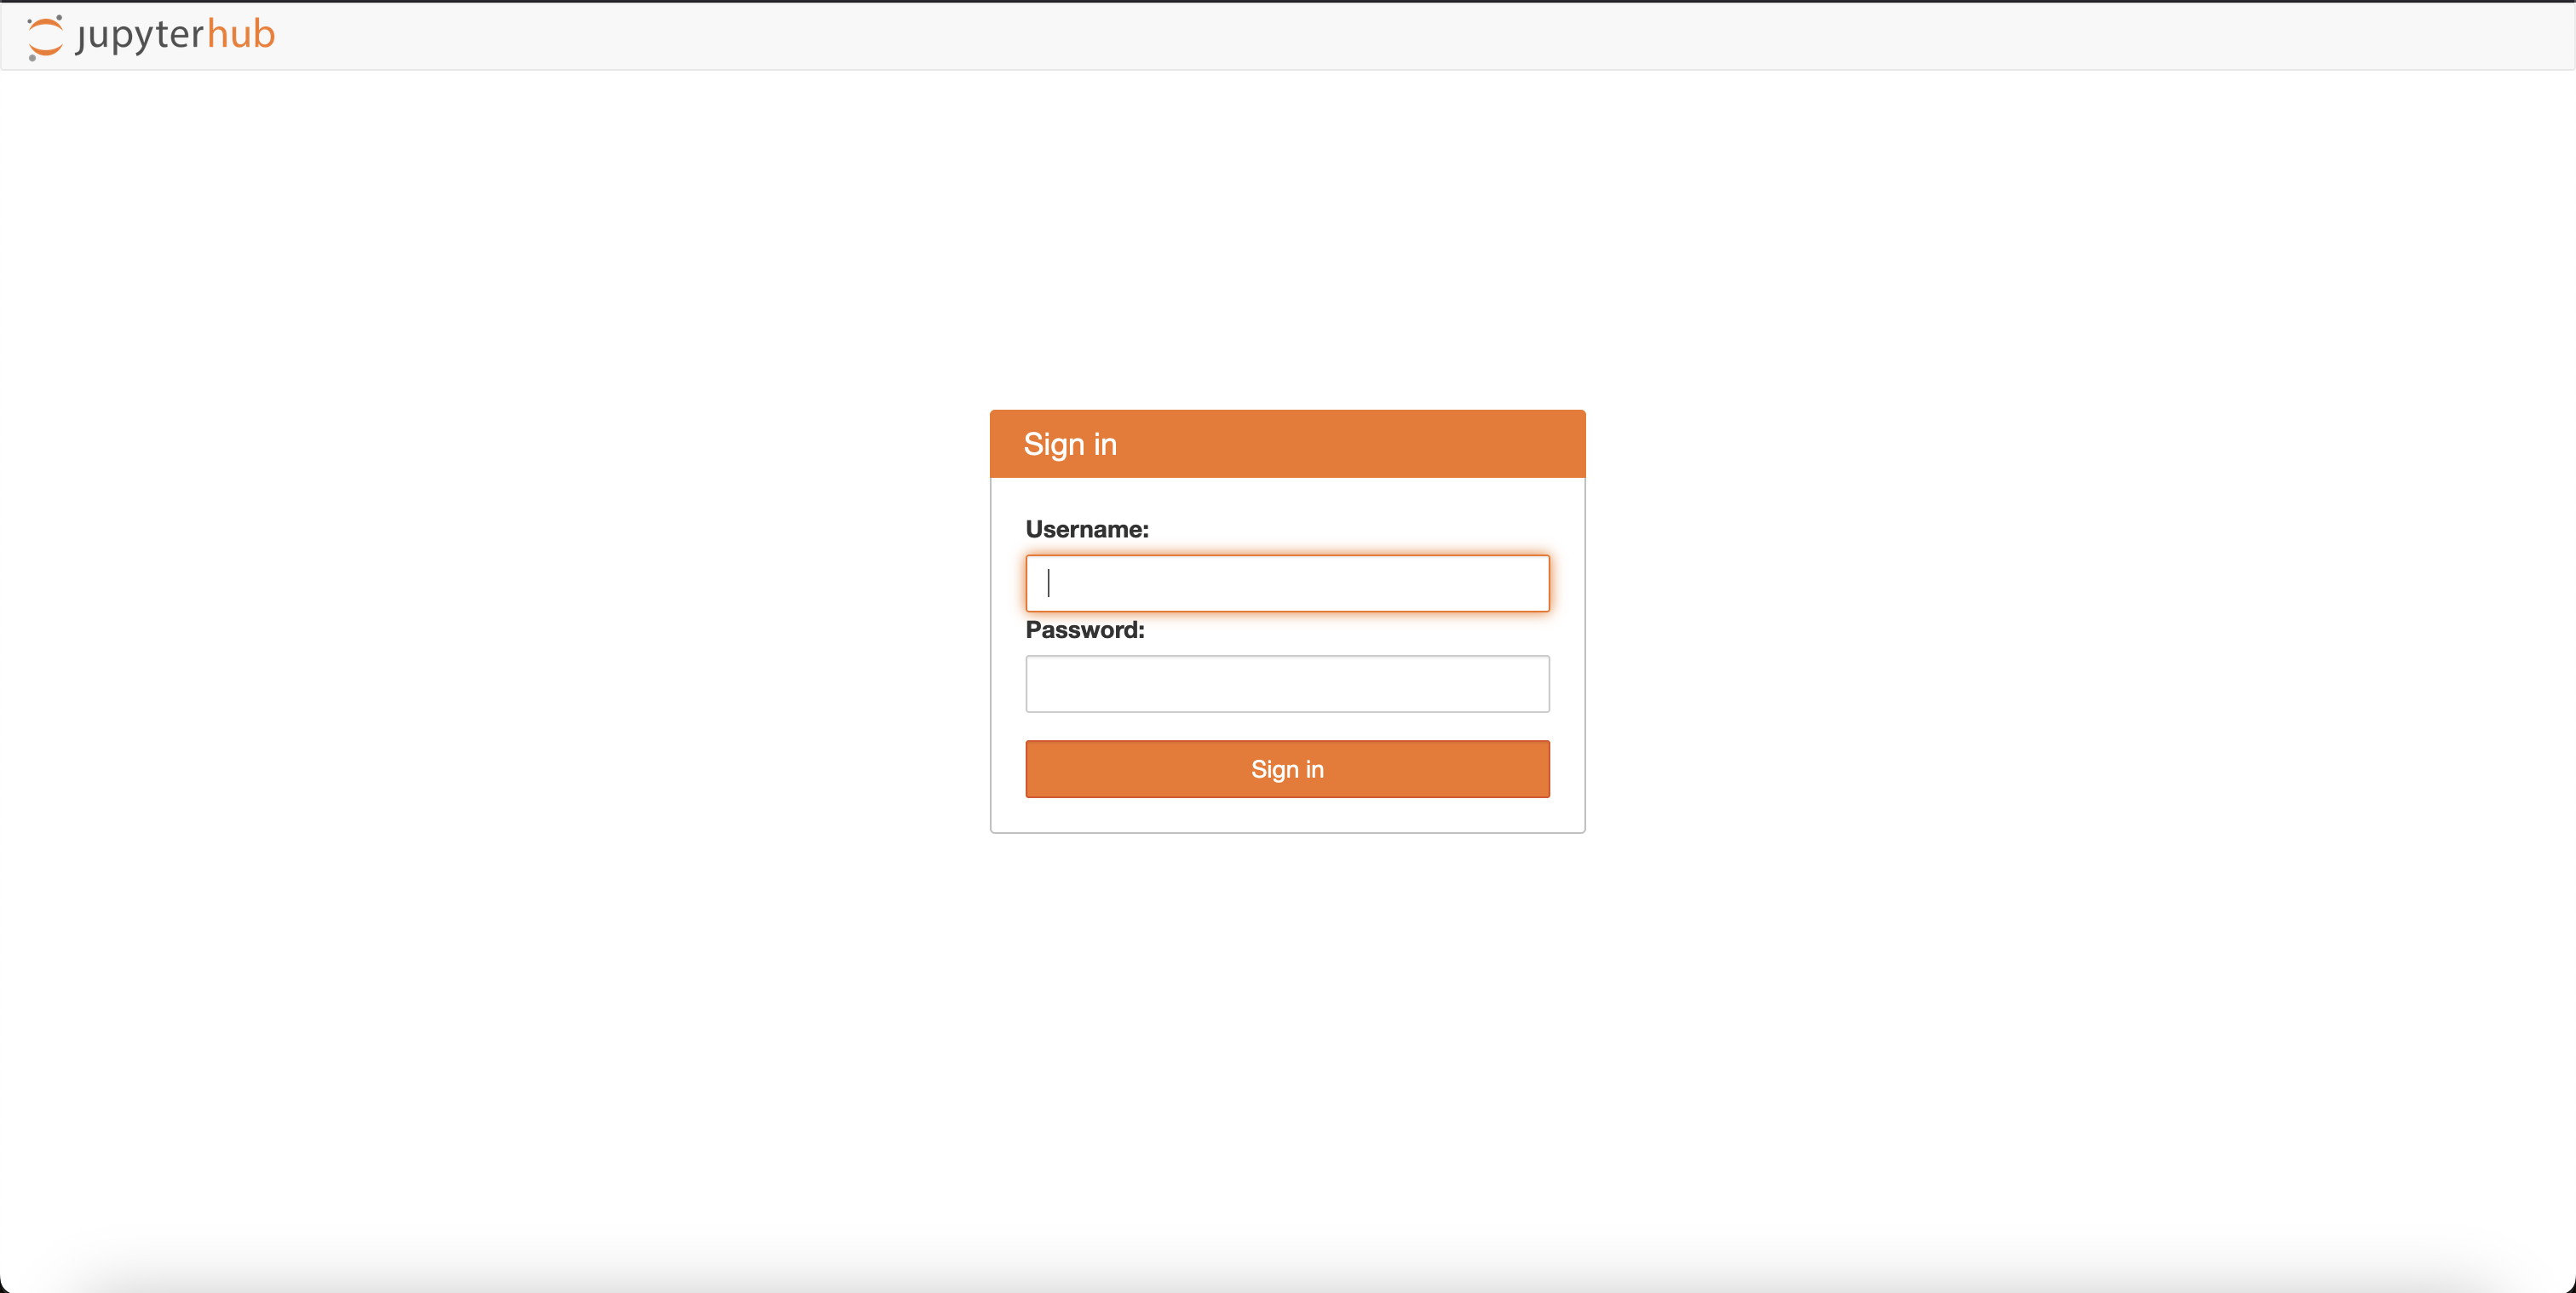
Fill in any usernamer and password combination you would like and the user account will be made. Note that this user account literally is made and has its own pod in the project. It also has a persistent volume and all the other properties of any other user account created. However, you can use whatever password you want to access this account. In other words do not use this user actively and definitely do not store any (sensitive) data in this user account!
allow_users / admin_users authentication
If you will be working on your own in your JupyterHub instance it will be easiest to use the allow_users / admin_users authentication method. This method allows you to specify a user and admin account with a shared password. It is important that you keep this password a secret and safe! If people will get their hands on this they can acces your JupyterHub instance and log in as an admin, which can lead to hefty consequences.
If you want to make use of this config uncomment the following block of text and comment out the previous block of text seen at the Dummy authentication section above:
hub:
  # ...
  config:
    Authenticator:
      admin_users:
        - admin
      allowed_users:
        - user1
    DummyAuthenticator:
      password: a-shared-secret-password
    JupyterHub:
      authenticator_class: dummy
Note that this password is in plaintext in your config-basic.yaml. Do not use a password you use for other accounts, this is never a good idea and is surely not a good idea in this case! Unfortunately it is not possible to set passwords in JupyterHub using secrets in the DSRI at the moment. If you need to share your JupyterHub instance with others we recommend you to use the GitHub OAuth authentication method described below.
GitHub OAuth authentication
This authentication method is the most secure option we provide at the moment. It makes use of an GitHub OAuth app. The major caveat is that you and the people you want to collaborate with need a GitHub account.
For creating an OAuth app in GitHub please refer to GitHub's documentation.
The GitHub OAuth app will provide the client ID and client secret. Fill in the <route name> and <project name> at the oauth_callback_url section. To set up a route to get your <route name> see the following section: Creating a secured route using the DSRI website, or Creating a secured route using the CLI. Note that you can change the <route name> at a later moment by upgrading the config-basic.yaml.
Access is granted based on username. Admin privileges are set for users in the admin_users group, while allowed_users are regular users that are able to log in to the instance.
hub:
  # ...
  config:
    GitHubOAuthenticator:
      client_id: your-client-id
      client_secret: your-client-secret
      oauth_callback_url: https://<route name>-<project name>.apps.dsri2.unimaas.nl/hub/oauth_callback
      admin_users:
        - username
      allowed_users:
        - username1
        - username2
      scope:
        - read:org
    JupyterHub:
      authenticator_class: github
Moreover, it is possible to grant users access to the instance via an GitHub organization. For this, you will need to create an organization, or have admin rights in an organization. To set up an organization, please refer to GitHub's documentation.
Make sure that the OAuth app for allowing organizations is made within the organization and not for your personal GitHub account! From the organization's GitHub page in the left sidebar, click Developer settings. Then, in the left sidebar, click OAuth apps.
Using this method, you grant people authorization to log in to the JupyterHub instance with their GitHub account based on GitHub organization membership. Users who need admin privileges should be added to the admin_users group in the config. Add your own GitHub username to this list so you are sure you have admin privileges.
hub:
  # ...
  config:
    GitHubOAuthenticator:
      client_id: your-client-id
      client_secret: your-client-secret
      oauth_callback_url: https://<route name>-<project name>.apps.dsri2.unimaas.nl/hub/oauth_callback
      admin_users:
        - username
      allowed_organizations:
        - my-github-organization
      scope:
        - read:org
    JupyterHub:
      authenticator_class: github
It is also possible to limit the access to specific teams in your organization. This allows to give more granular access based on team membership within the organization.
hub:
  # ...
  config:
    GitHubOAuthenticator:
      client_id: your-client-id
      client_secret: your-client-secret
      oauth_callback_url: https://<route name>-<project name>.apps.dsri2.unimaas.nl/hub/oauth_callback
      admin_users:
        - username
      allowed_organizations:
        - my-github-organization:my-team
      scope:
        - read:org
    JupyterHub:
      authenticator_class: github
It is possible to enable UM SSO login for your JupyterHub instance. However, this needs some setting up from our side. If you would like to enable this, please send an email to rcs-ub@maastrichtuniversity.nl.
Configure the notebook image
The default notebook image used in the config-basic.yaml is the k8s-singleuser-sample image, version 3.3.8.
singleuser:
  #...
  image:
    name: quay.io/jupyterhub/k8s-singleuser-sample
    pullPolicy: null
    pullSecrets: []
    tag: 3.3.8
It is, however, possible to change this notebook image to configure the JupyterHub instance to start up user pods with a customized image, which could have various things installed such as different kernels, packages and/or extensions. For more information about different images provided by Jupyter, please refer to their documentation.
For example you can change the notebook image to their Tensorflow image, which comes with Tensorflow pre-installed!
singleuser
  #...
  image:
    name: quay.io/jupyter/tensorflow-notebook
    pullPolicy: null
    pullSecrets: []
    tag: 87b37b4fd818
Note that we chose the latest tag at the time of writing: 87b37b4fd818. Change this tag accordingly if a more recent release is available! You can find their releases via their Quay.io repository: https://quay.io/organization/jupyter.
Adjusting spawner timeouts
If the sessions fail to start with a "spawner failed" or "timeout" error, it may be because the user's container is taking too long to become read.
To fix this, the start_timeout can be increased (for the pod to start) and http_timeout (for the Jupyter server to respond) in the config-basic.yaml.
The following configuration sets both timeouts to 300 seconds (5 minutes), which is a robust starting point for most environments.
hub:
  # ...
  config:
    KubeSpawner:
      start_timeout: 300
      http_timeout: 300
Extensive customization options in config-extensive.yaml
It is possible to customize your JupyterHub instance further. For example we created a config-extensive.yaml file which has some customization options configured.
Download the preconfigured config-extensive.yaml from our GitHub repository.
In this configuration we disabled culling so that user pods will not be scaled down after a time of inactivity. This can easily be activated again changing cull: > enabled: false to true.
Next, we extended the startup command to install a Python package papersize upon user pod creation. Additionally, we pull a public GitHub repository, if it does not exist already, to the /home/jovyan/materials directory. This directory will automatically be made if it does not exist already.
singleuser:
  #...
  # Remove the git clone part or fill in a valid URL, otherwise the user-pod will not start!
  cmd:
    - /bin/bash
    - '-c'
    - >-
      pip install papersize && [ "$(ls -A /home/jovyan/materials 2>/dev/null)" ]
      || git clone https://github.com/EbookFoundation/free-programming-books.git
      /home/jovyan/materials && exec jupyterhub-singleuser
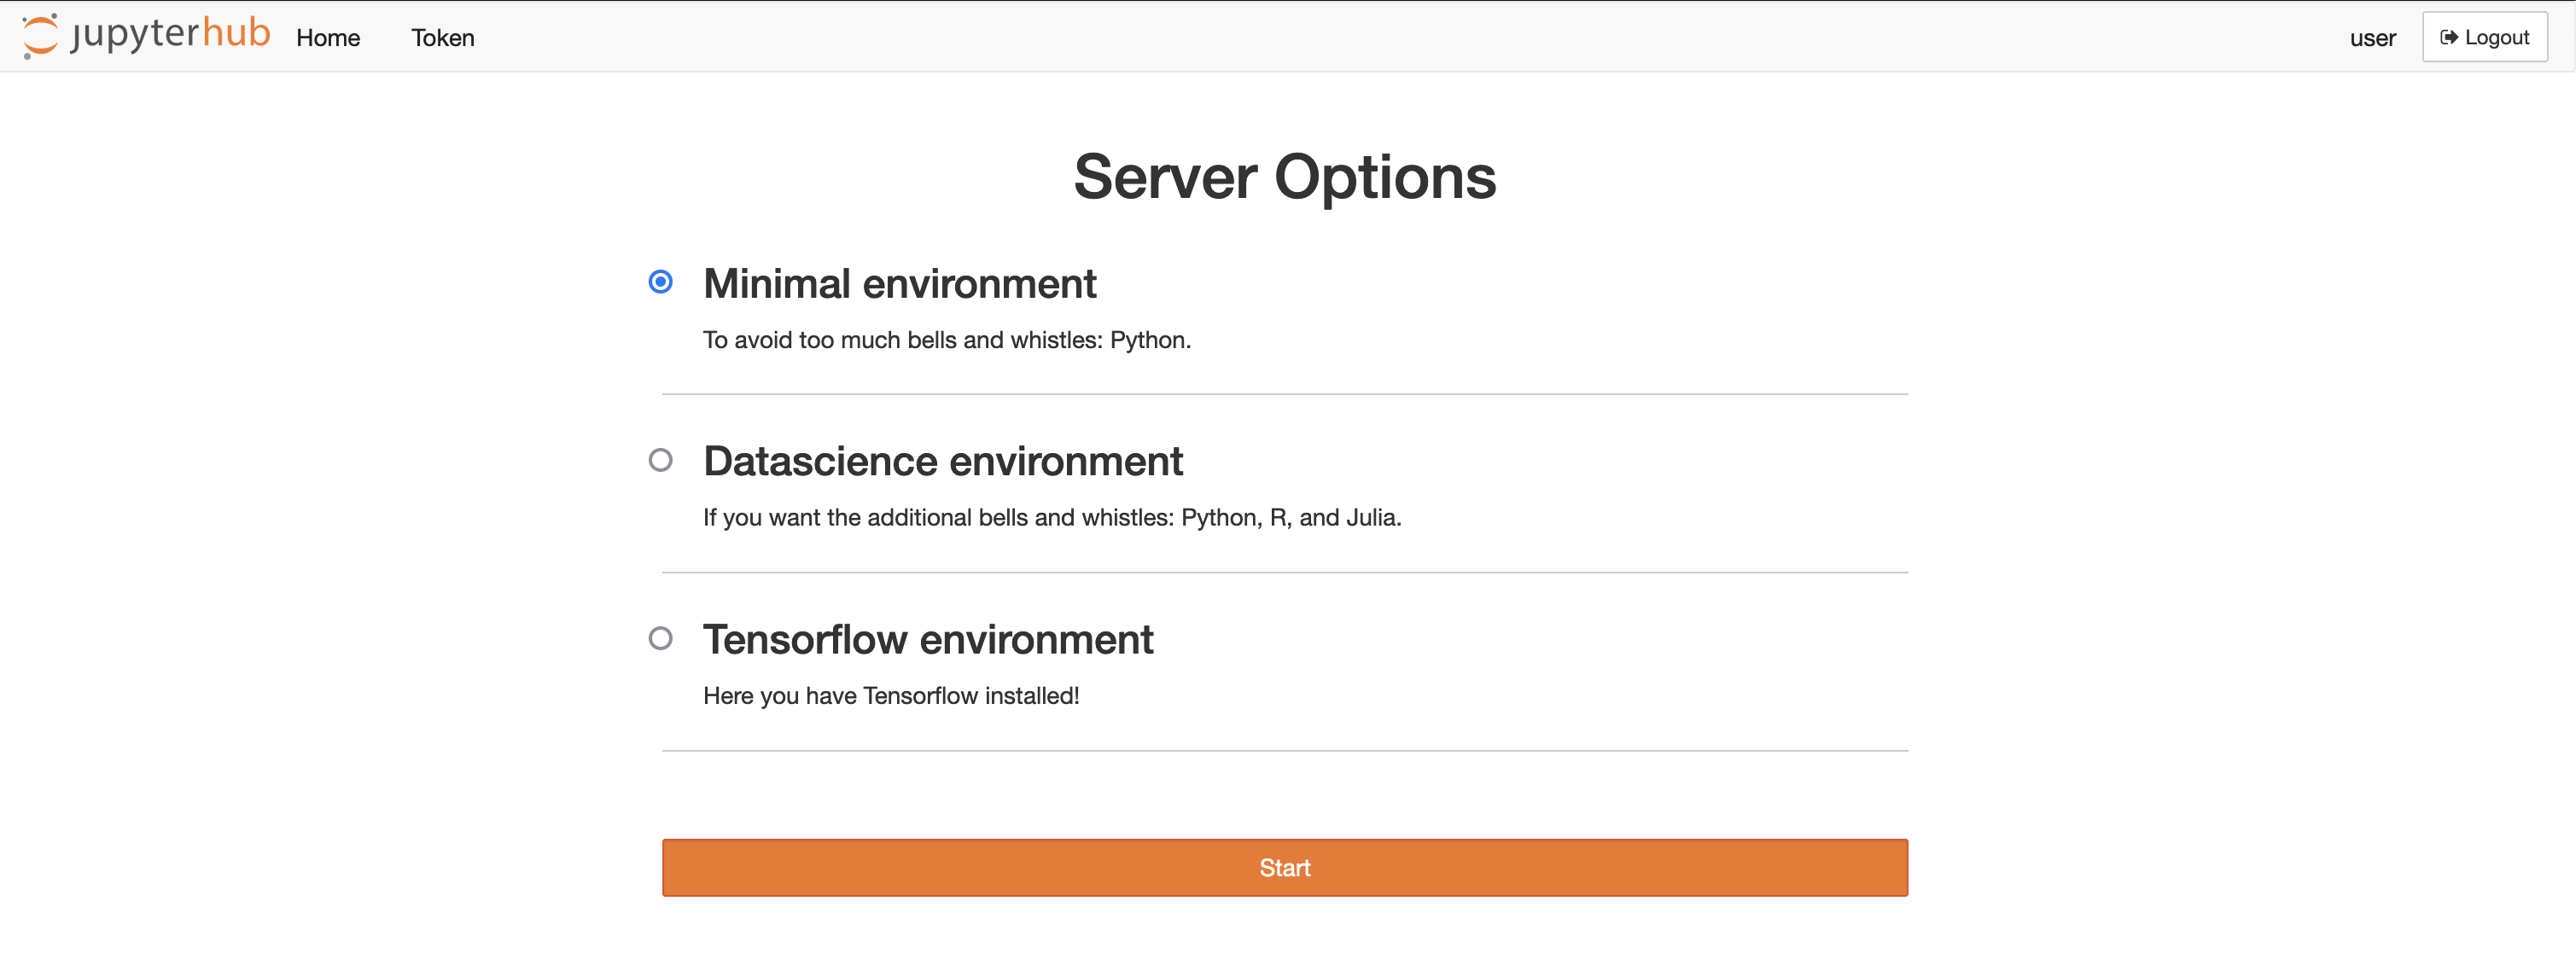
Finally, we chose to include two additional notebook images. Besides the minimal image, we include the data science and Tensorflow images. These notebook images come with other kernels, packages and extensions installed. For more information about different images provided by Jupyter, please refer to their documentation.
image:
    name: quay.io/jupyter/minimal-notebook
    pullPolicy: null
    pullSecrets: []
    tag: 87b37b4fd818
  profileList:
    - display_name: "Minimal environment"
      description: "To avoid too much bells and whistles: Python."
      default: true
    - display_name: "Datascience environment"
      description: "If you want the additional bells and whistles: Python, R, and Julia."
      kubespawner_override:
        image: quay.io/jupyter/datascience-notebook:87b37b4fd818
    - display_name: "Tensorflow environment"
      description: "Here you have Tensorflow installed!"
      kubespawner_override:
        image: quay.io/jupyter/tensorflow-notebook:87b37b4fd818
Note that we chose the latest tag at the time of writing: 87b37b4fd818. Change this tag accordingly if a more recent release is available! You can find their releases via their Quay.io repository: https://quay.io/organization/jupyter.
Upon the first creation of the user pod, in other words when the user logs in for the first time. They will see a menu where they can choose their preconfigured notebook by choice.
Adjusting spawner timeouts when including multiple notebook images
If the sessions fail to start with a "spawner failed" or "timeout" error, it may be because the user's container is taking too long to become read.
To fix this, the start_timeout can be increased (for the pod to start) and http_timeout (for the Jupyter server to respond) in the config-extensive.yaml.
The following configuration sets both timeouts to 300 seconds (5 minutes), which is a robust starting point for most environments.
image:
  # ...
  profileList:
    # ...
    - display_name: "Tensorflow environment"
      description: "Here you have Tensorflow installed!"
      kubespawner_override:
        image: quay.io/jupyter/tensorflow-notebook:87b37b4fd818
        start_timeout: 300
        http_timeout: 300
Deploying JupyterHub using the DSRI website 🪐
Download the preconfigured config-basic.yaml from our GitHub repository.
The default config that is provided by JupyterHub will not work.
Installing the JupyterHub Helm Chart repository
After you have created a project you can start with installing the JupyterHub Helm Chart. If you do not have access to DSRI or created a project yet, and you need to find out how, please refer to our documentation.
The Helm Chart should be already made available for everyone to use on the DSRI platform. There will be no need to install the repository yourself.
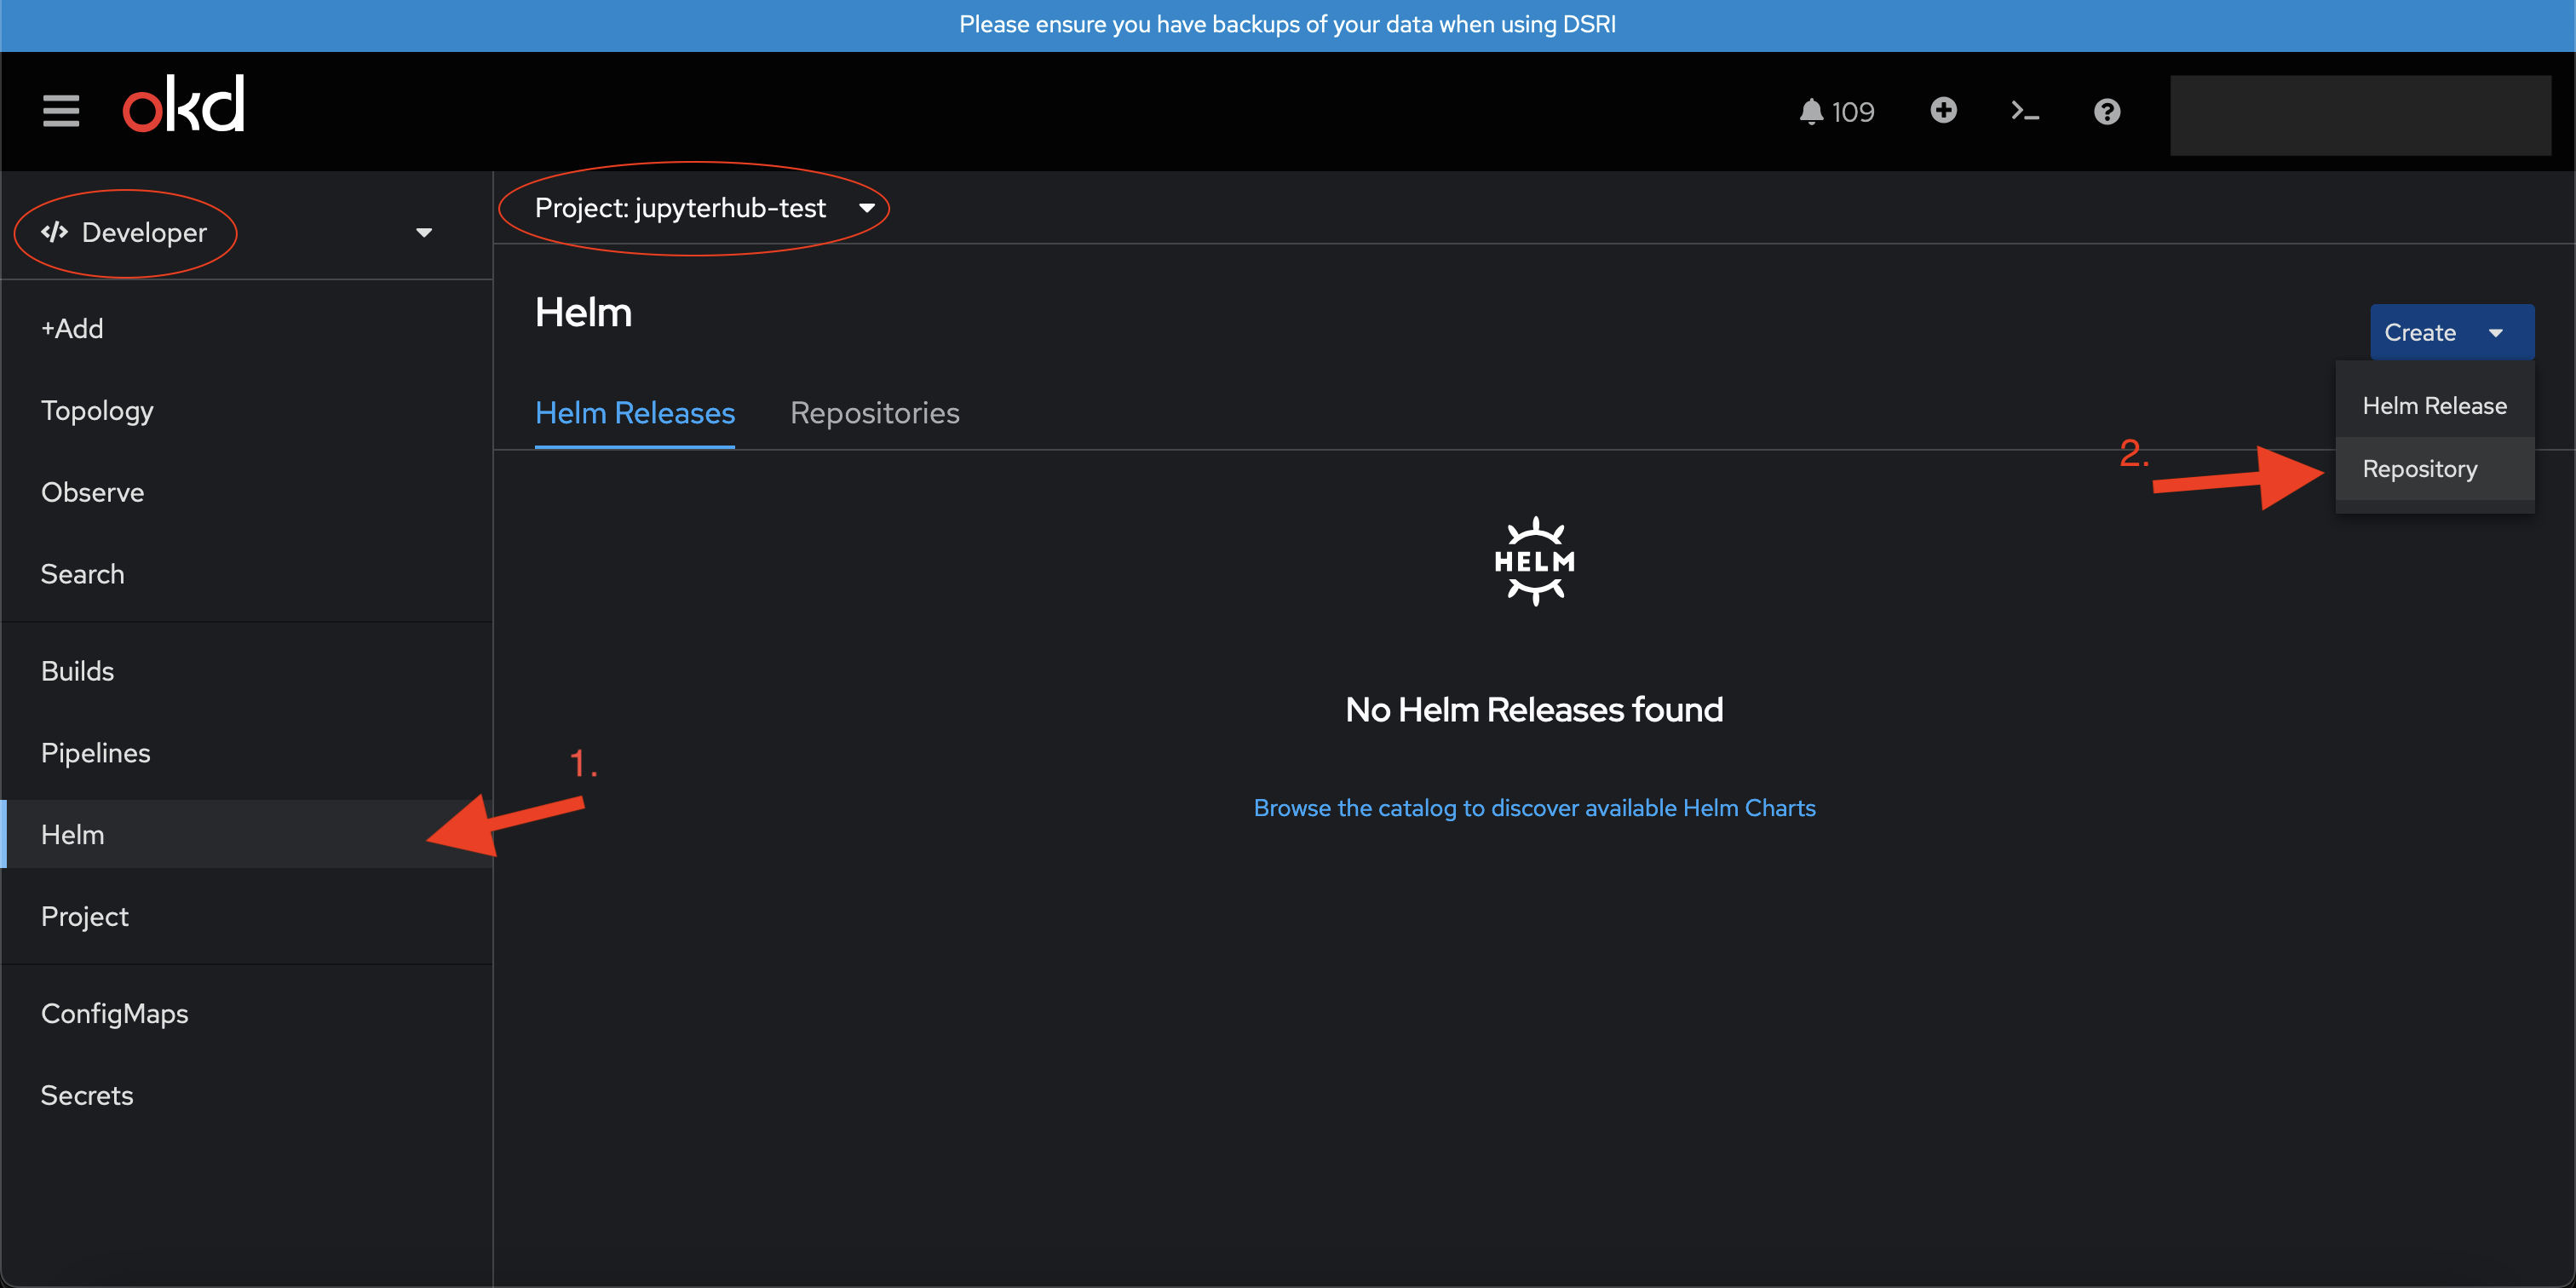
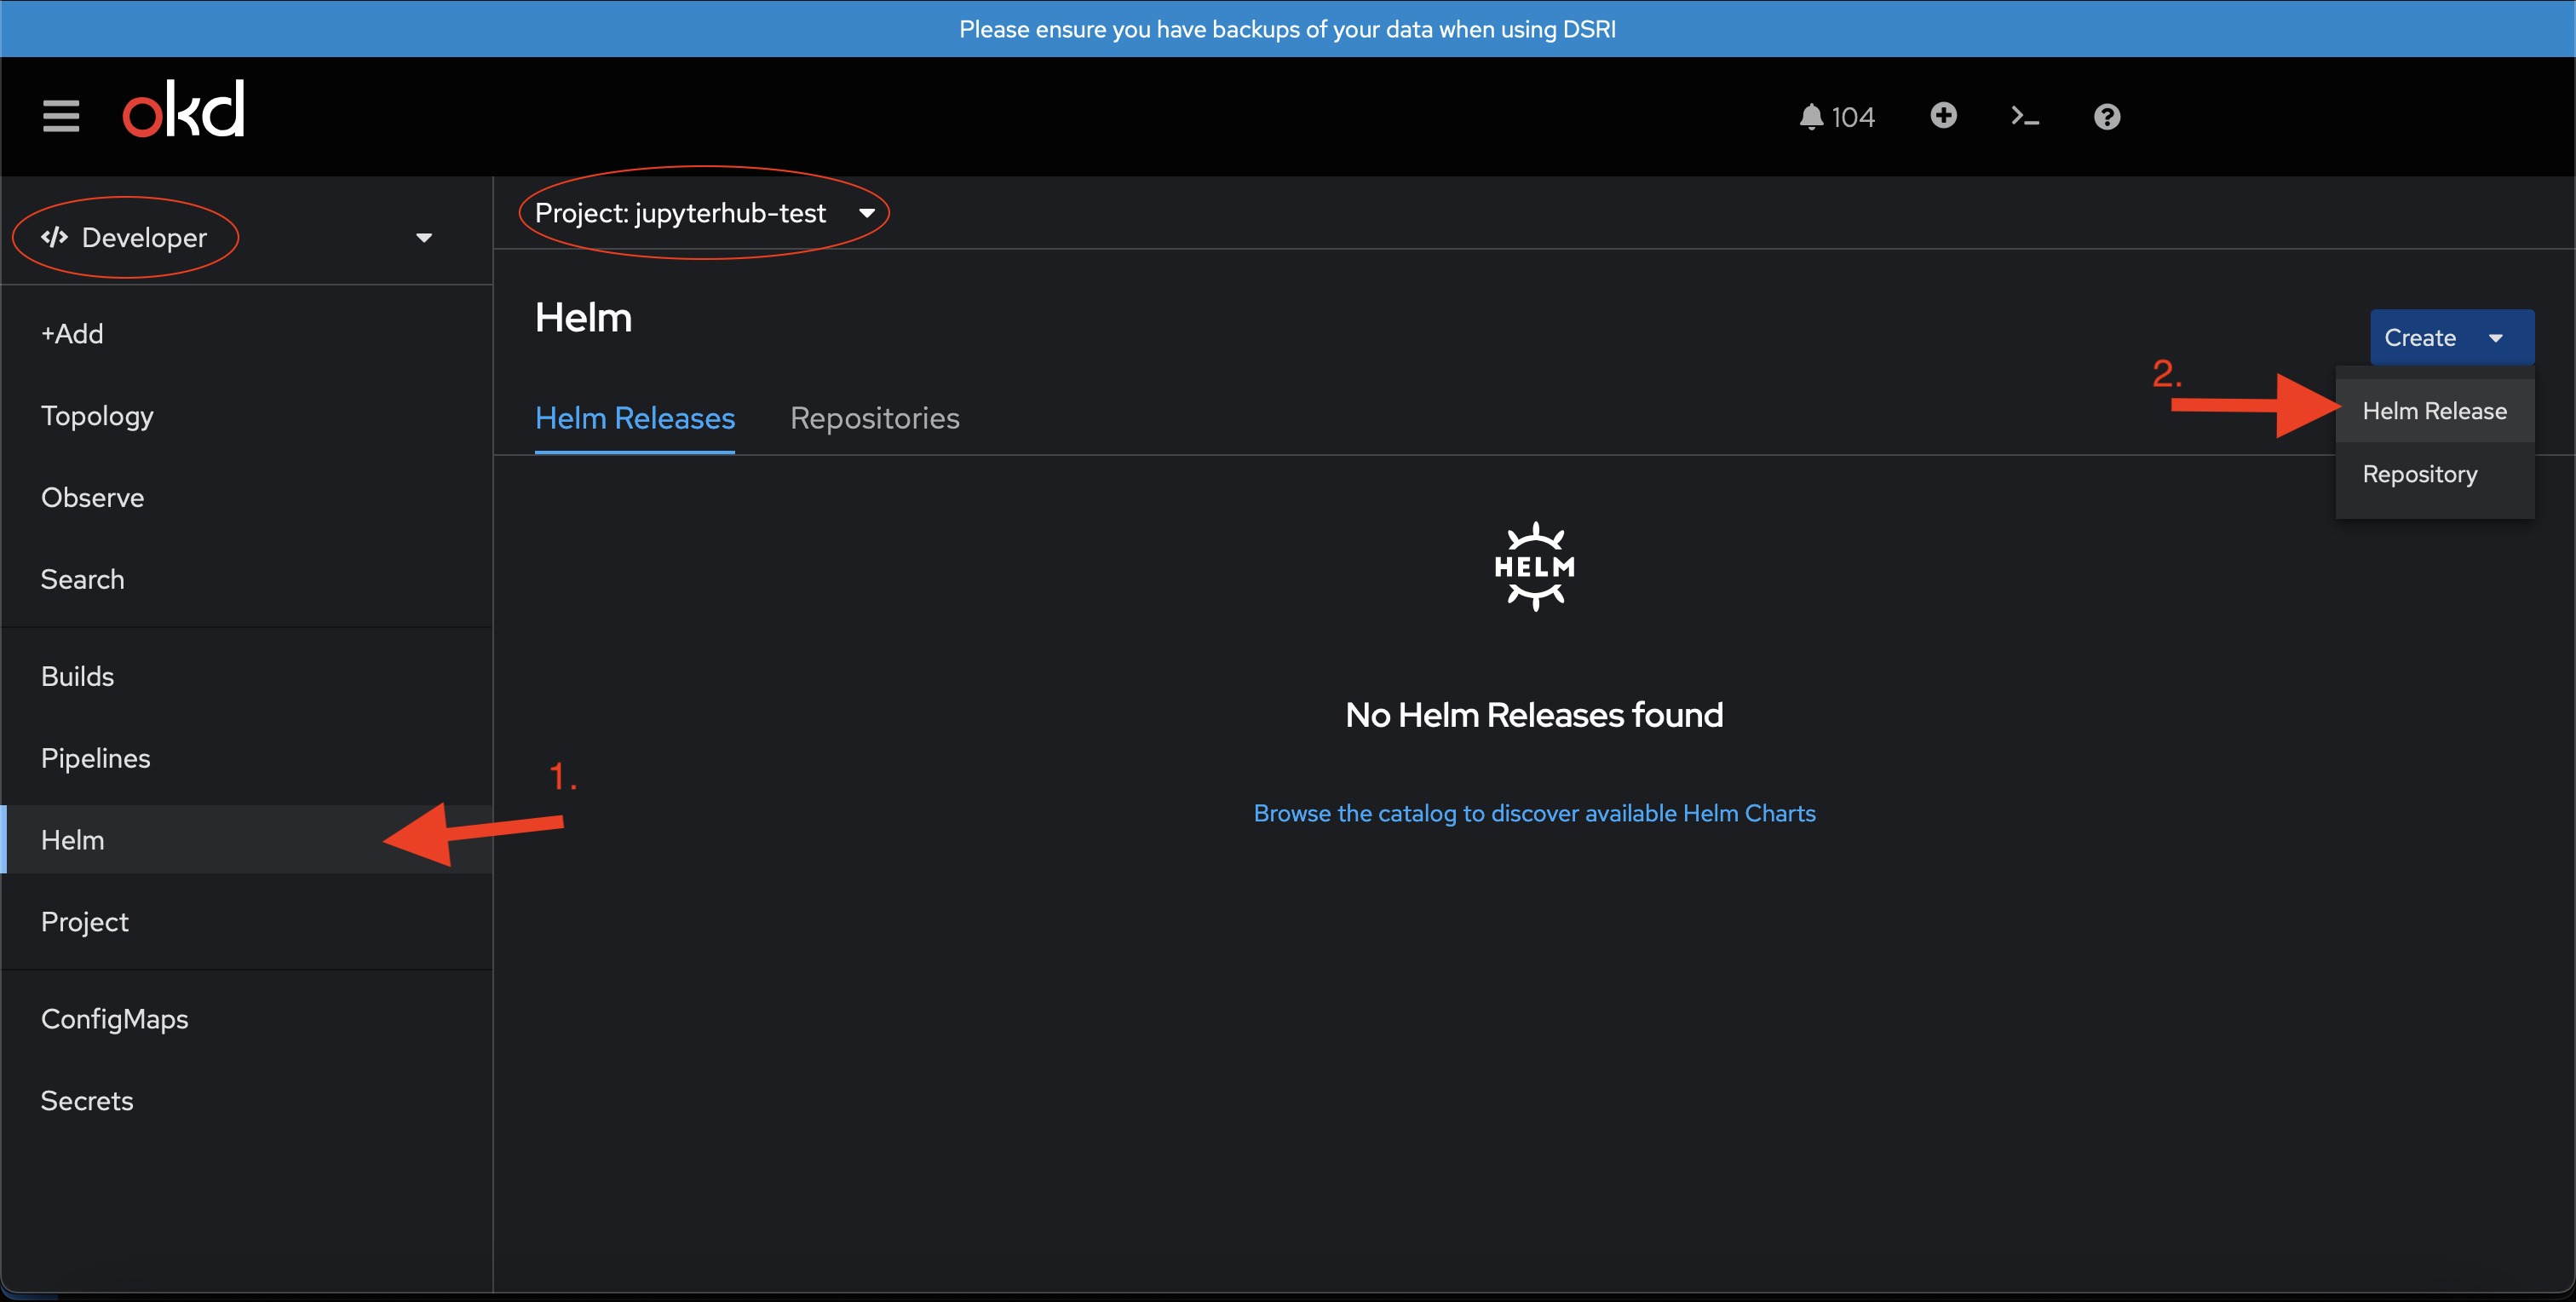
In Developer mode in your project, go to Helm in the sidepanel (1). Next, click on Create and choose Repository (2).
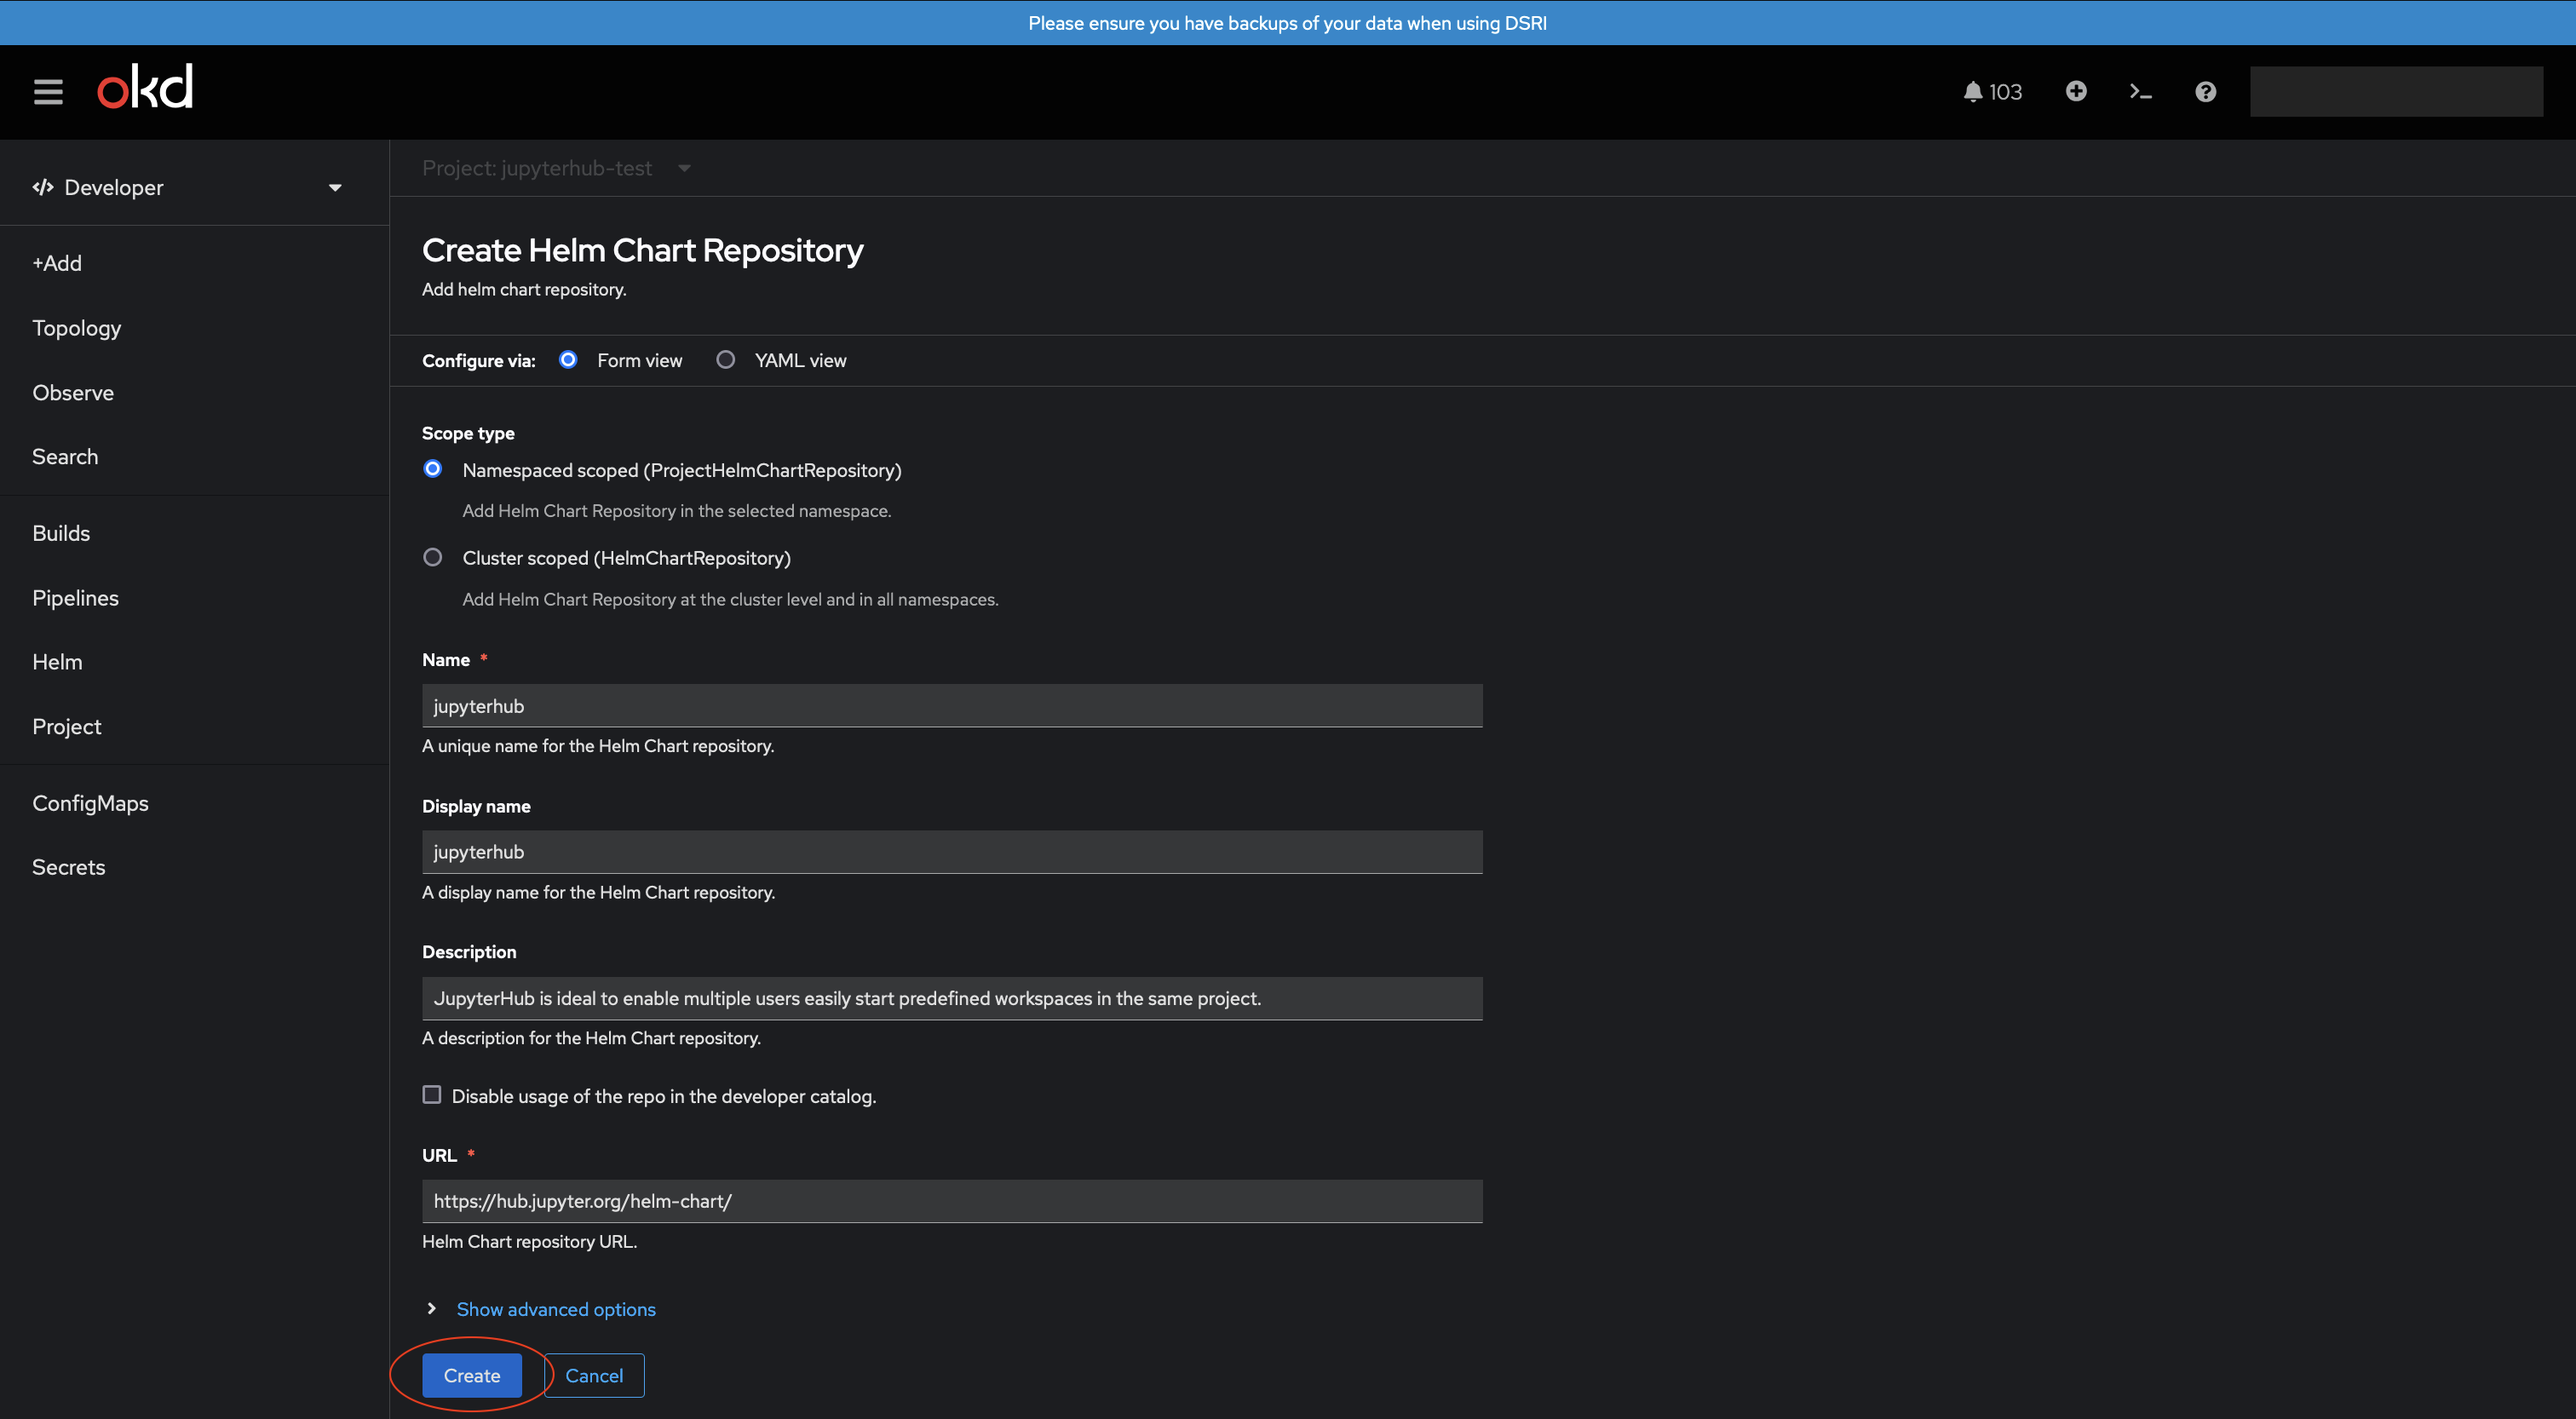
Then fill in the Name, Display Name, give it a Description and fill in the URL: https://hub.jupyter.org/helm-chart/.
Next, click Create.
Installing the JupyterHub Helm Chart
At the moment the latest -and only- Helm Chart version which is supported by DSRI is version 3.3.8. Newer versions will not work, and older versions are not tested and/or configured!
In Developer mode in your project, go to Helm in the sidepanel (1). Next, click on Create and choose Helm Release (2)
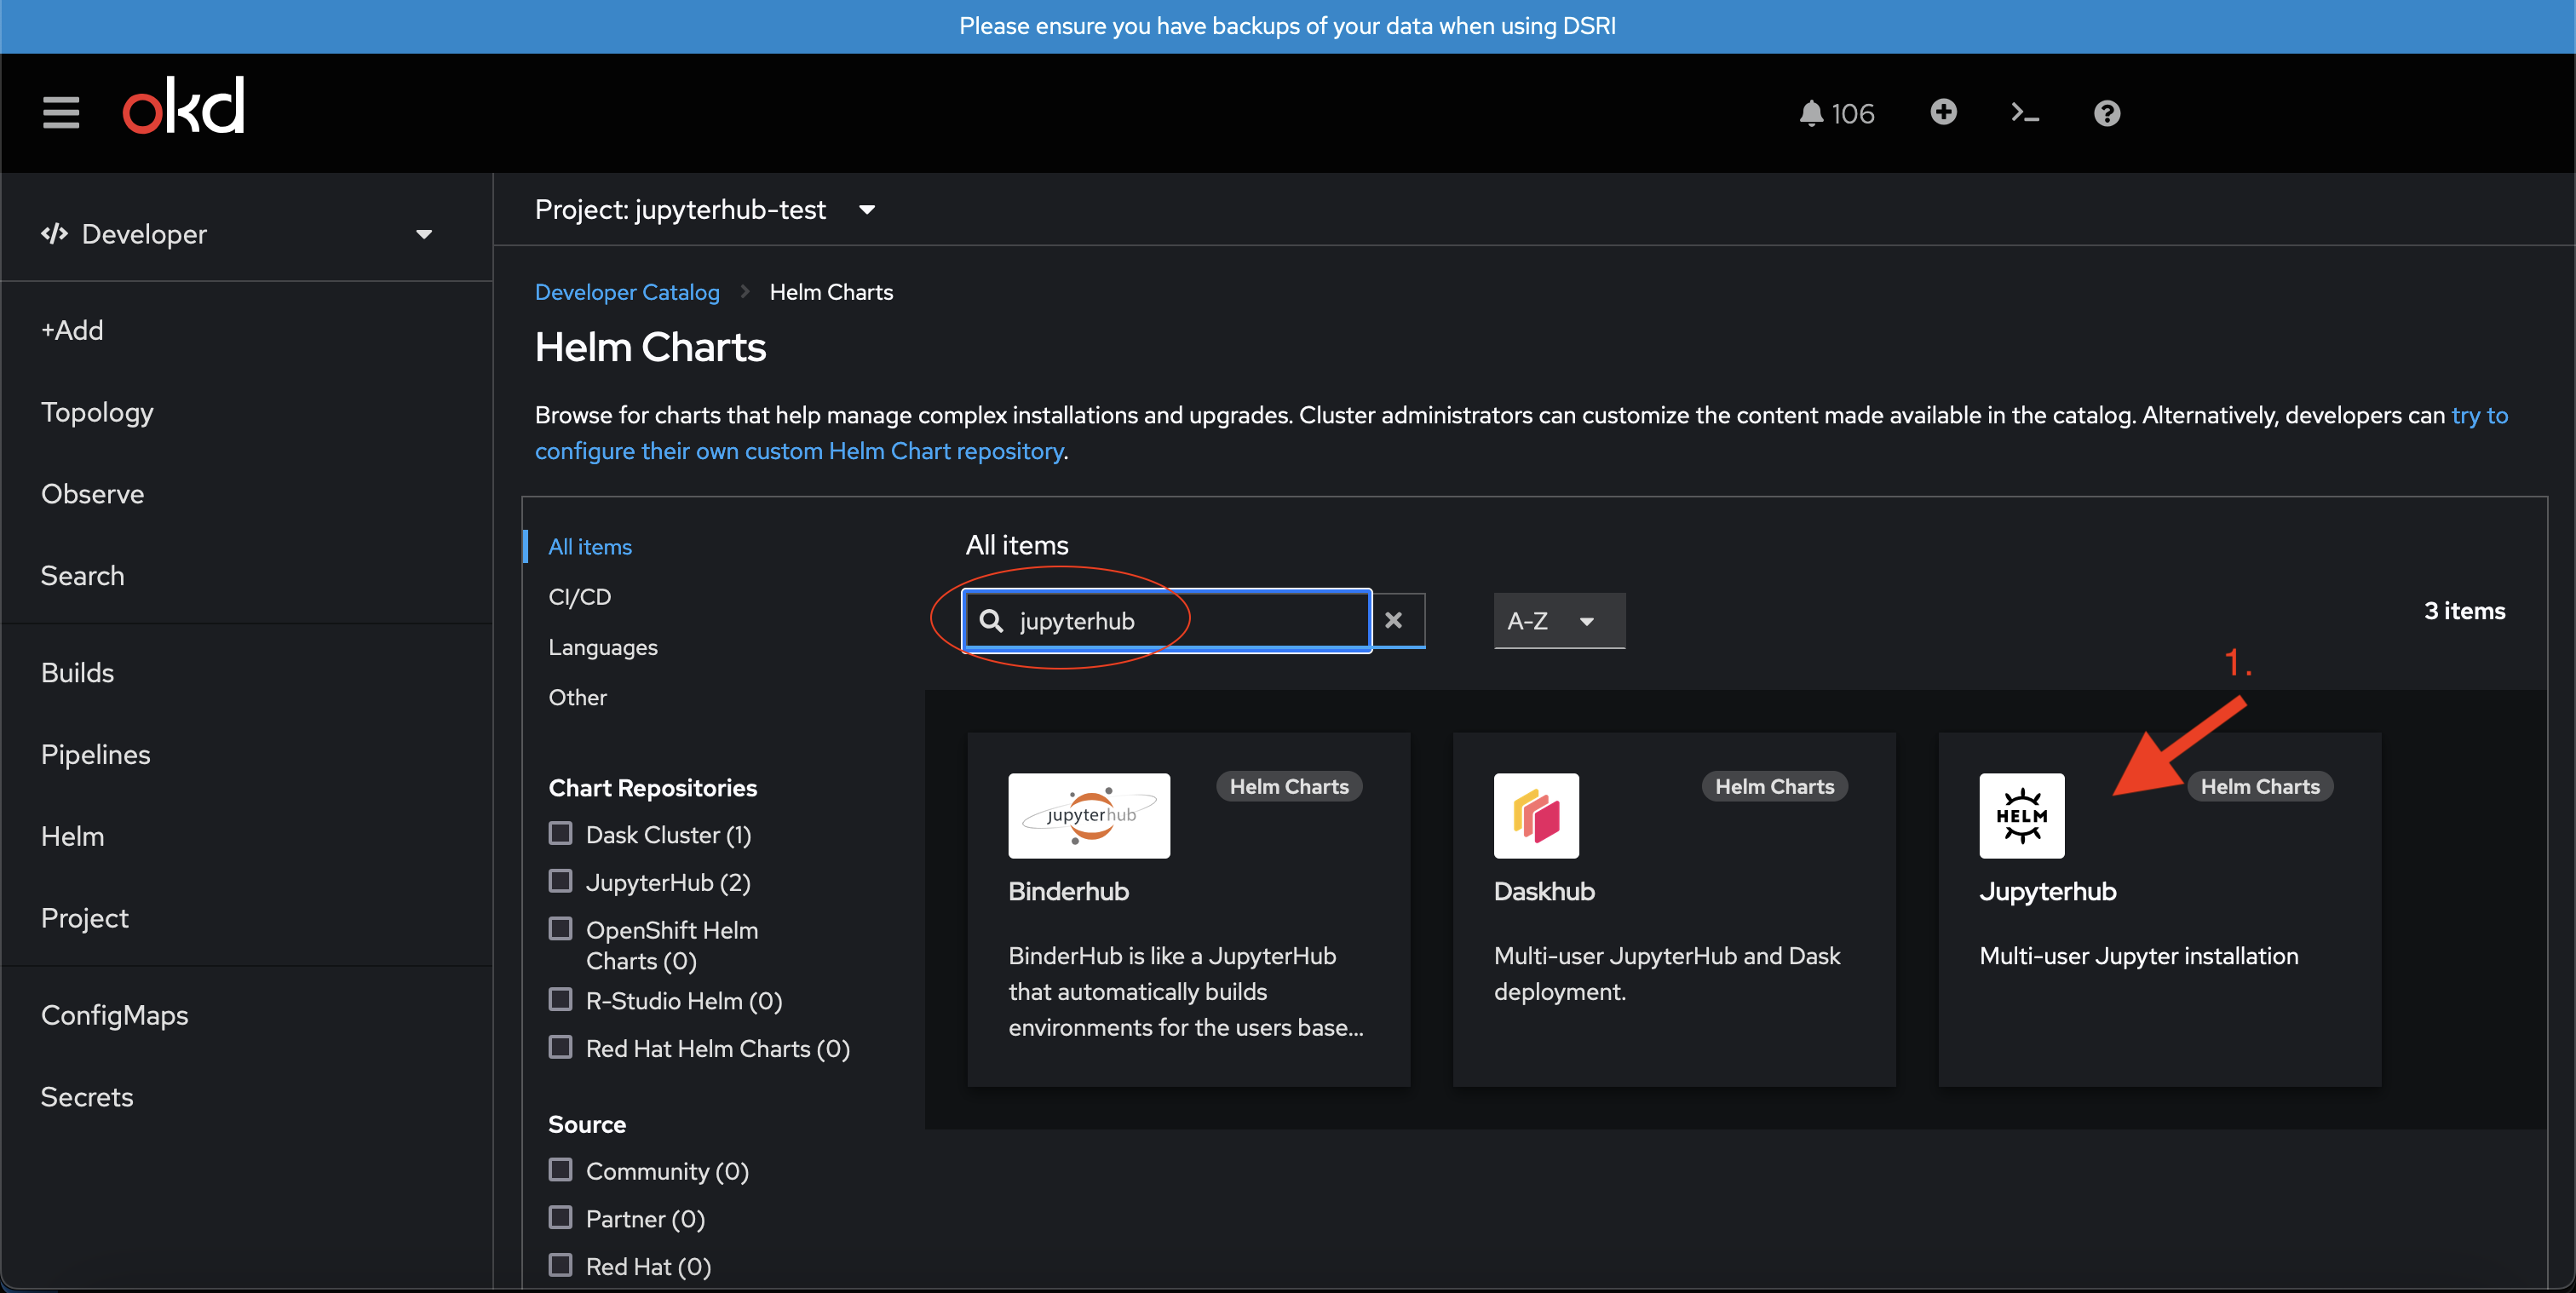
Search for jupyterhub (or the name you gave the repository if you added the repository yourself), and choose the JupyterHub Helm Chart (1).
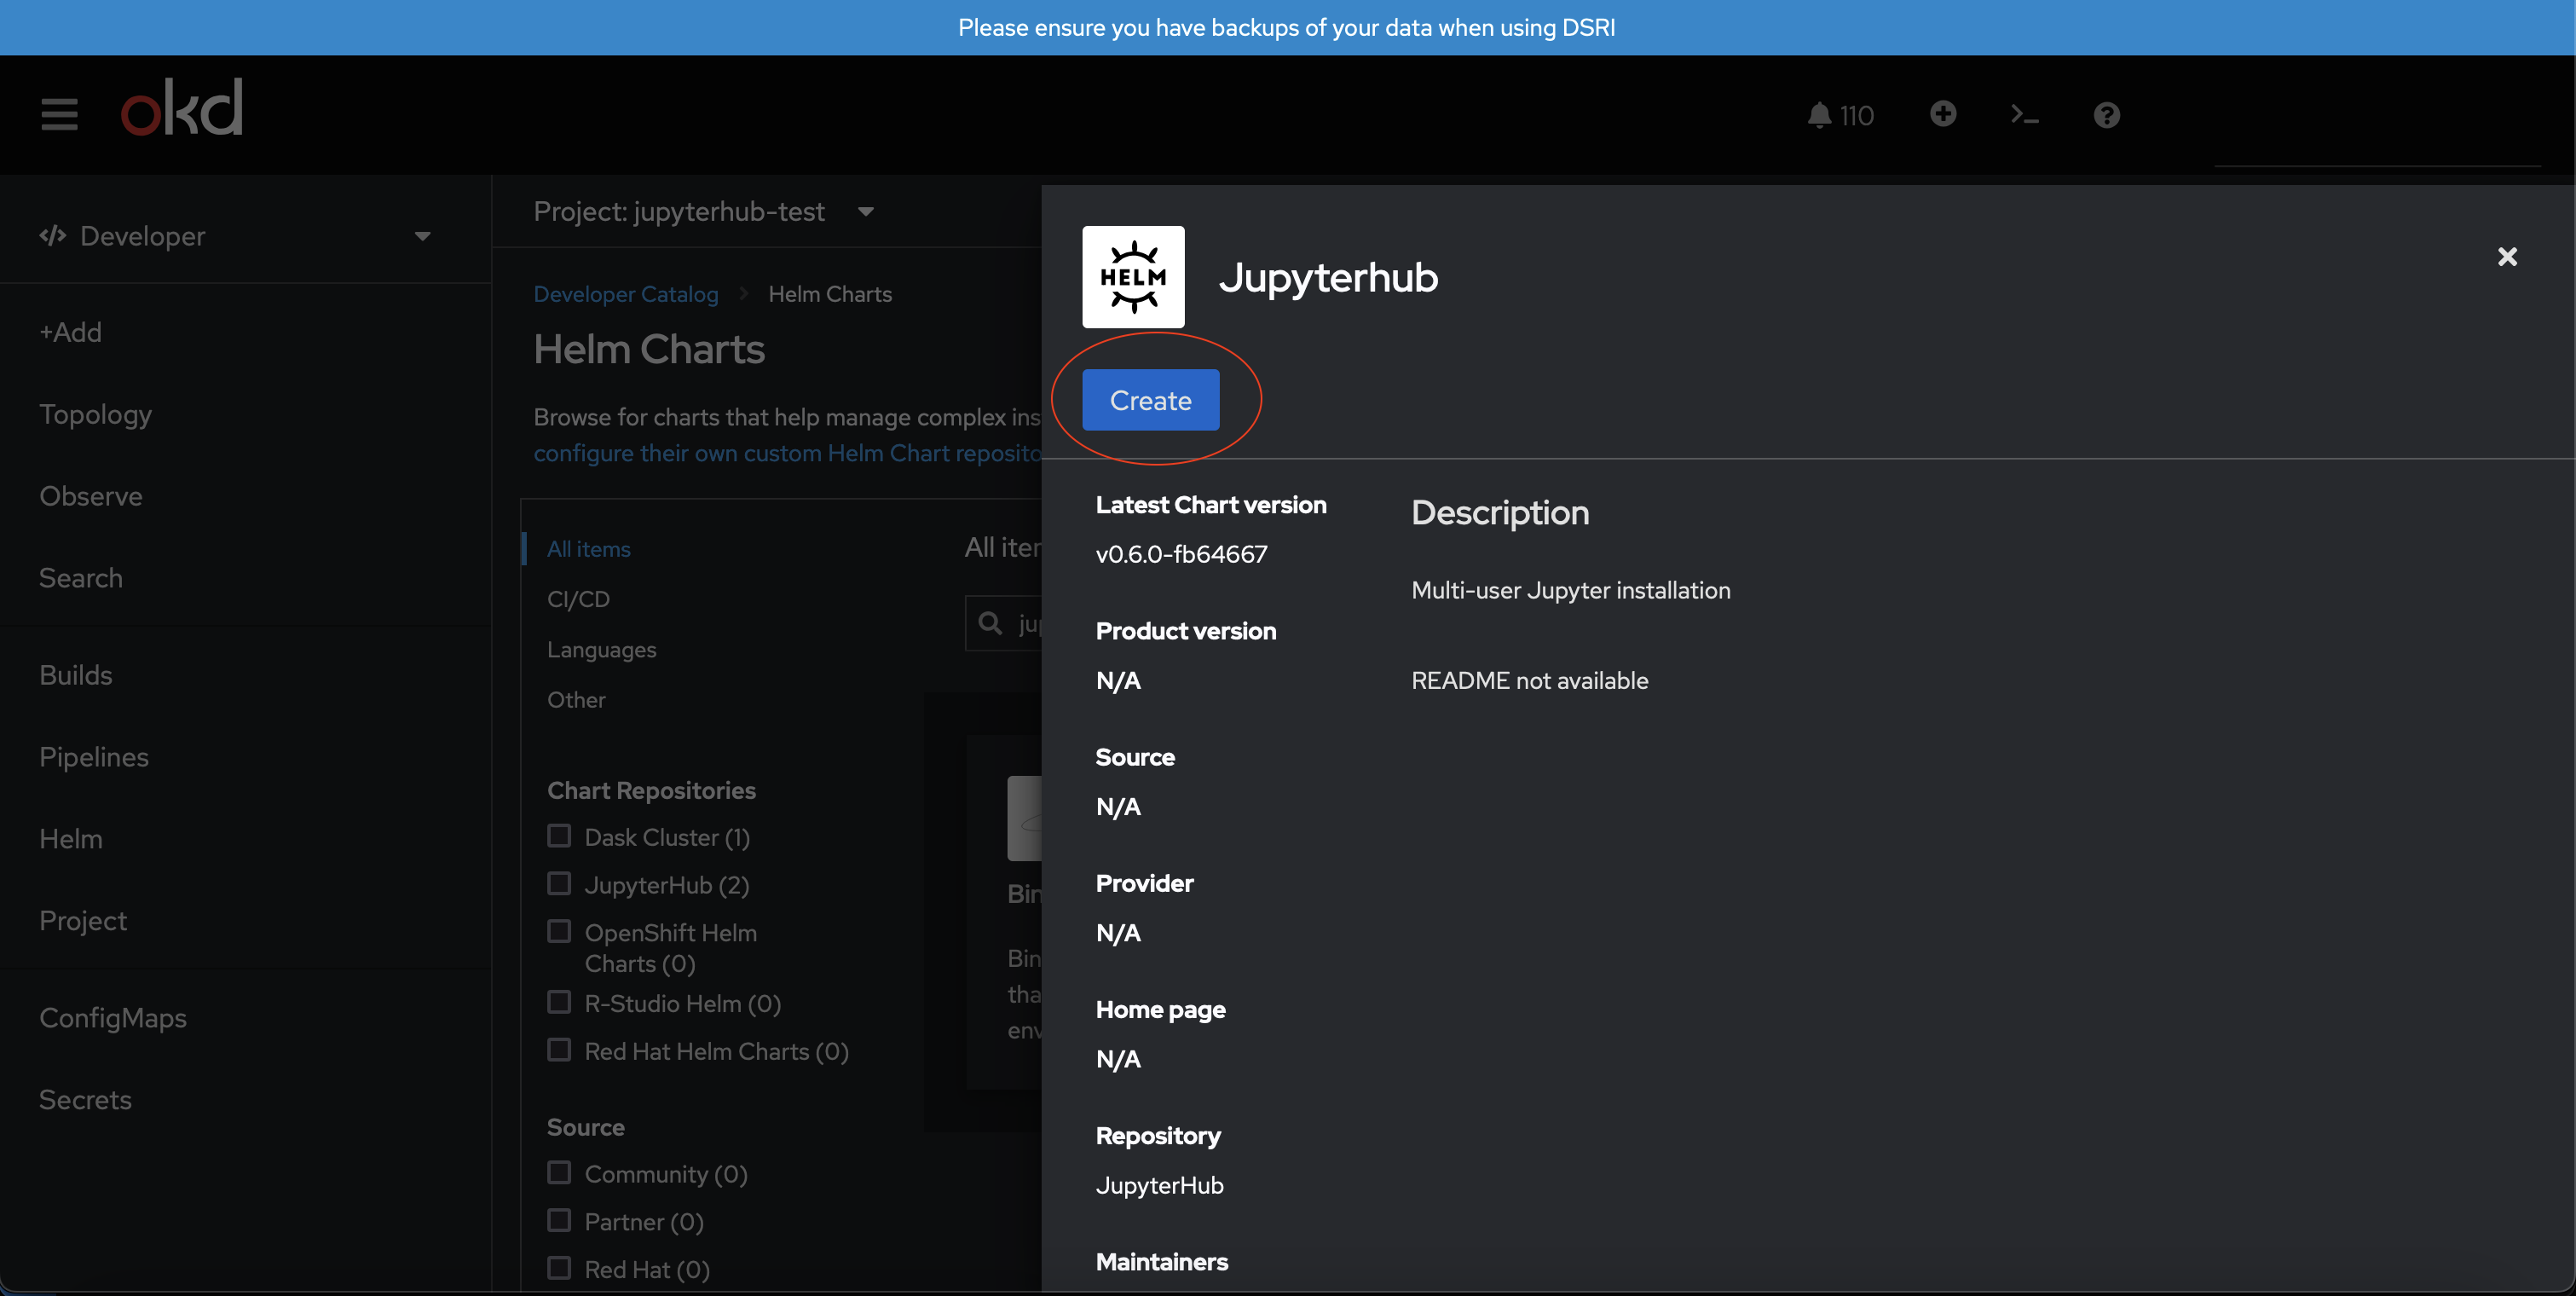
Click Create.
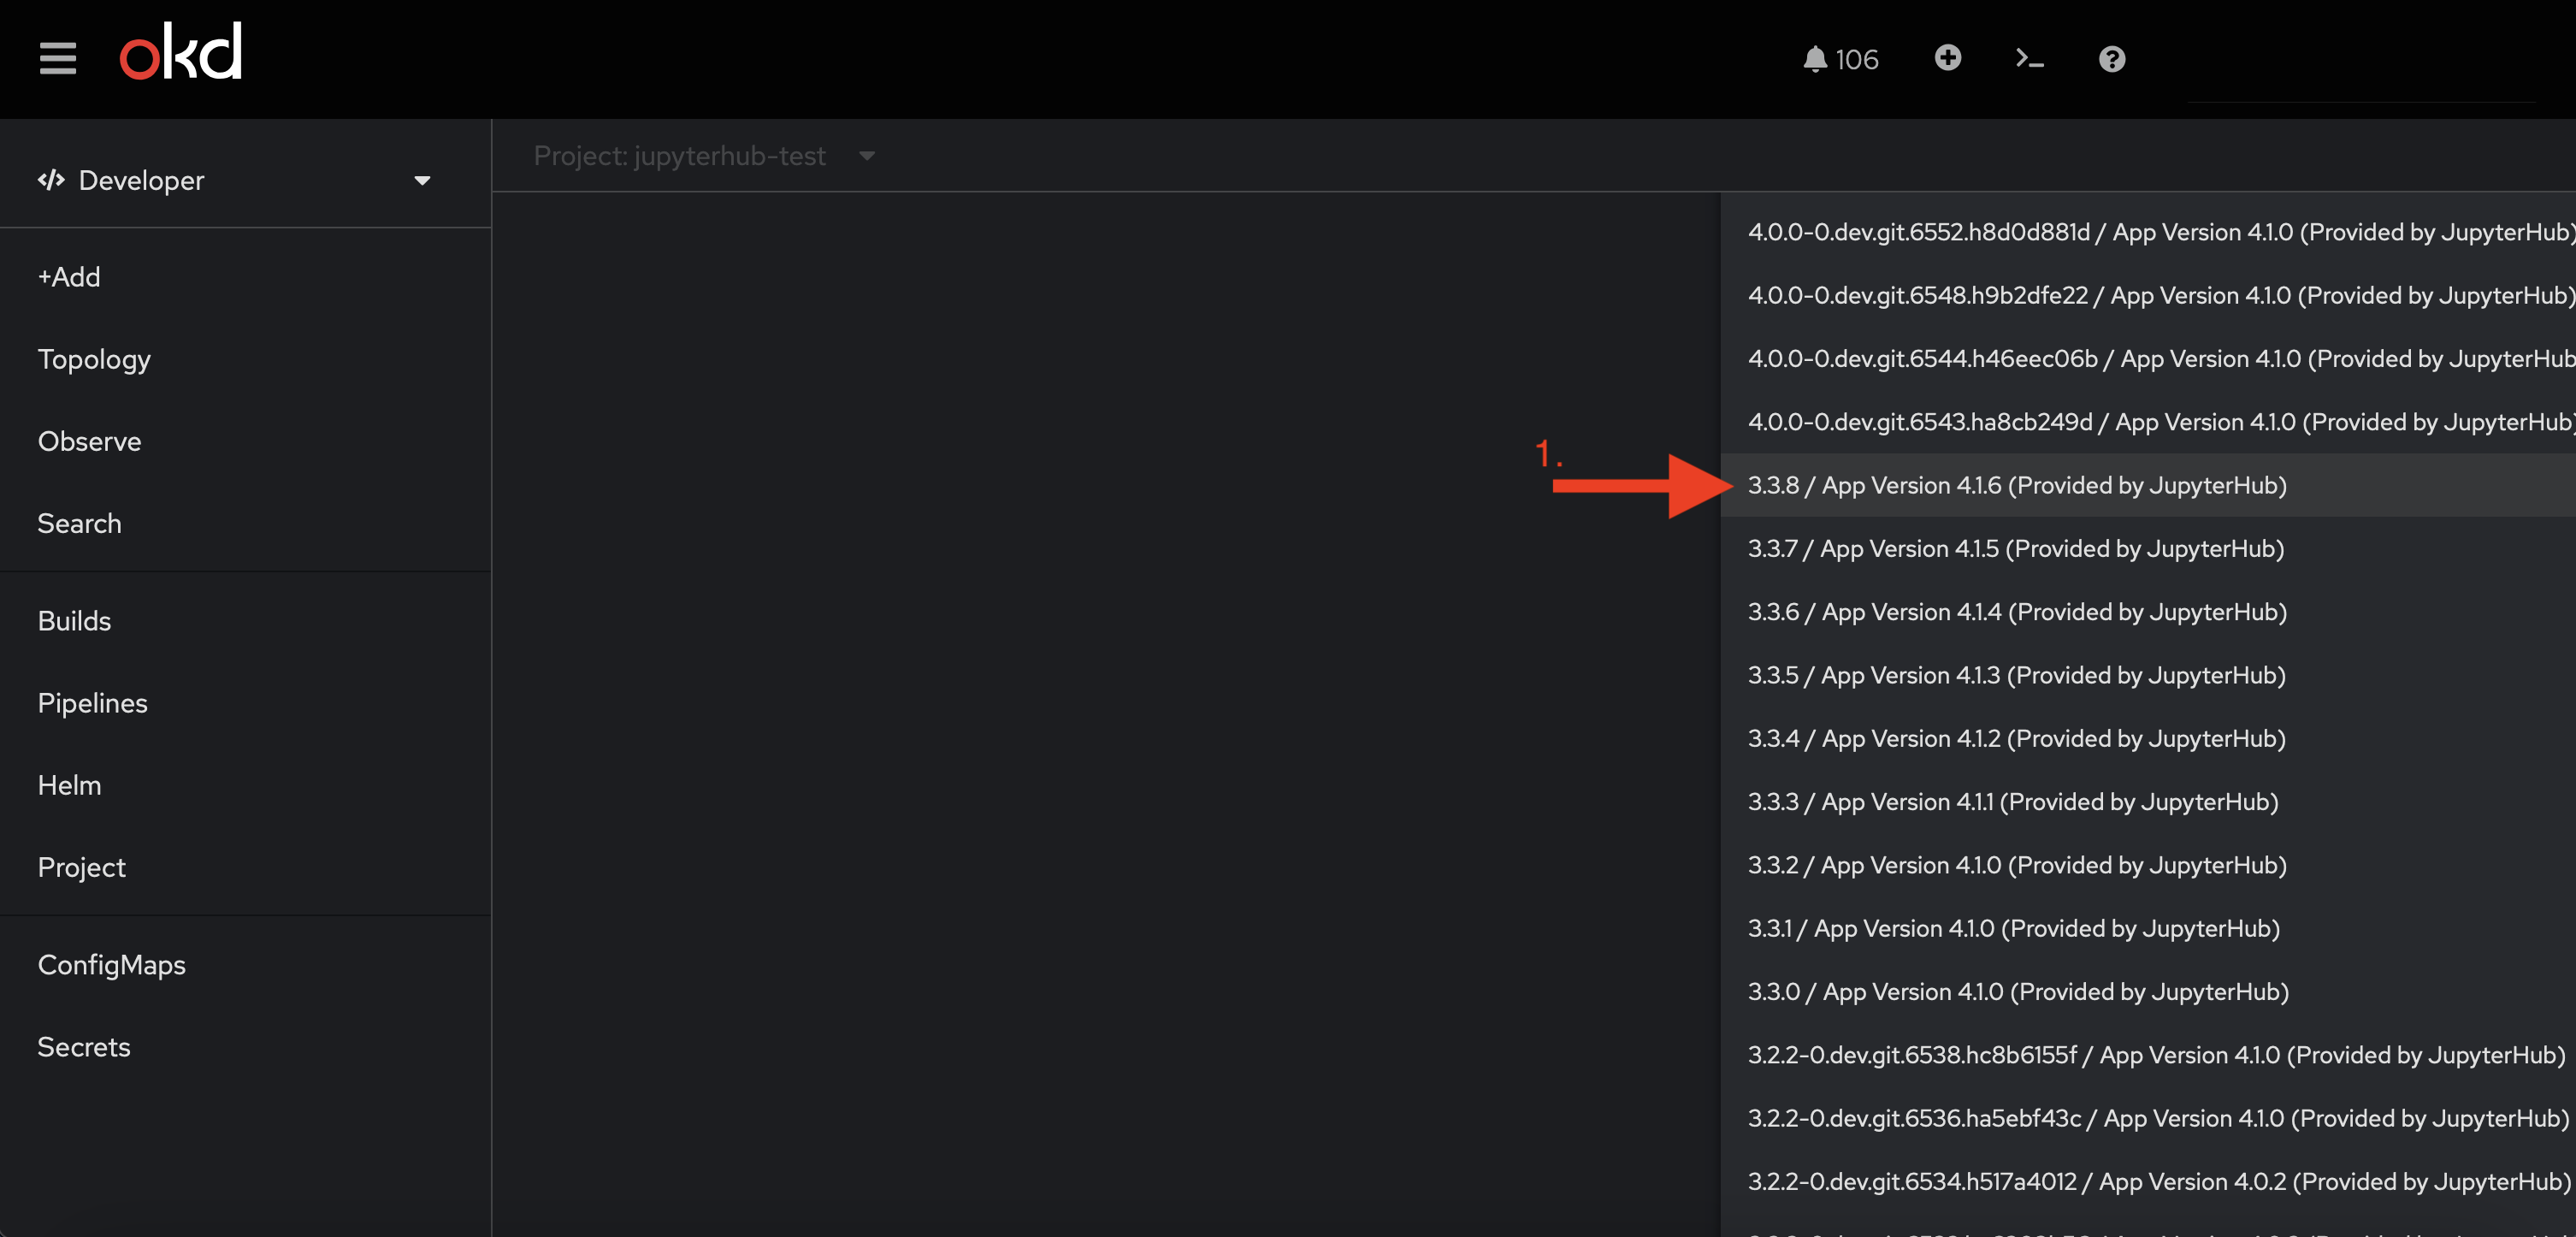
Click the Chart version drop down menu (1).
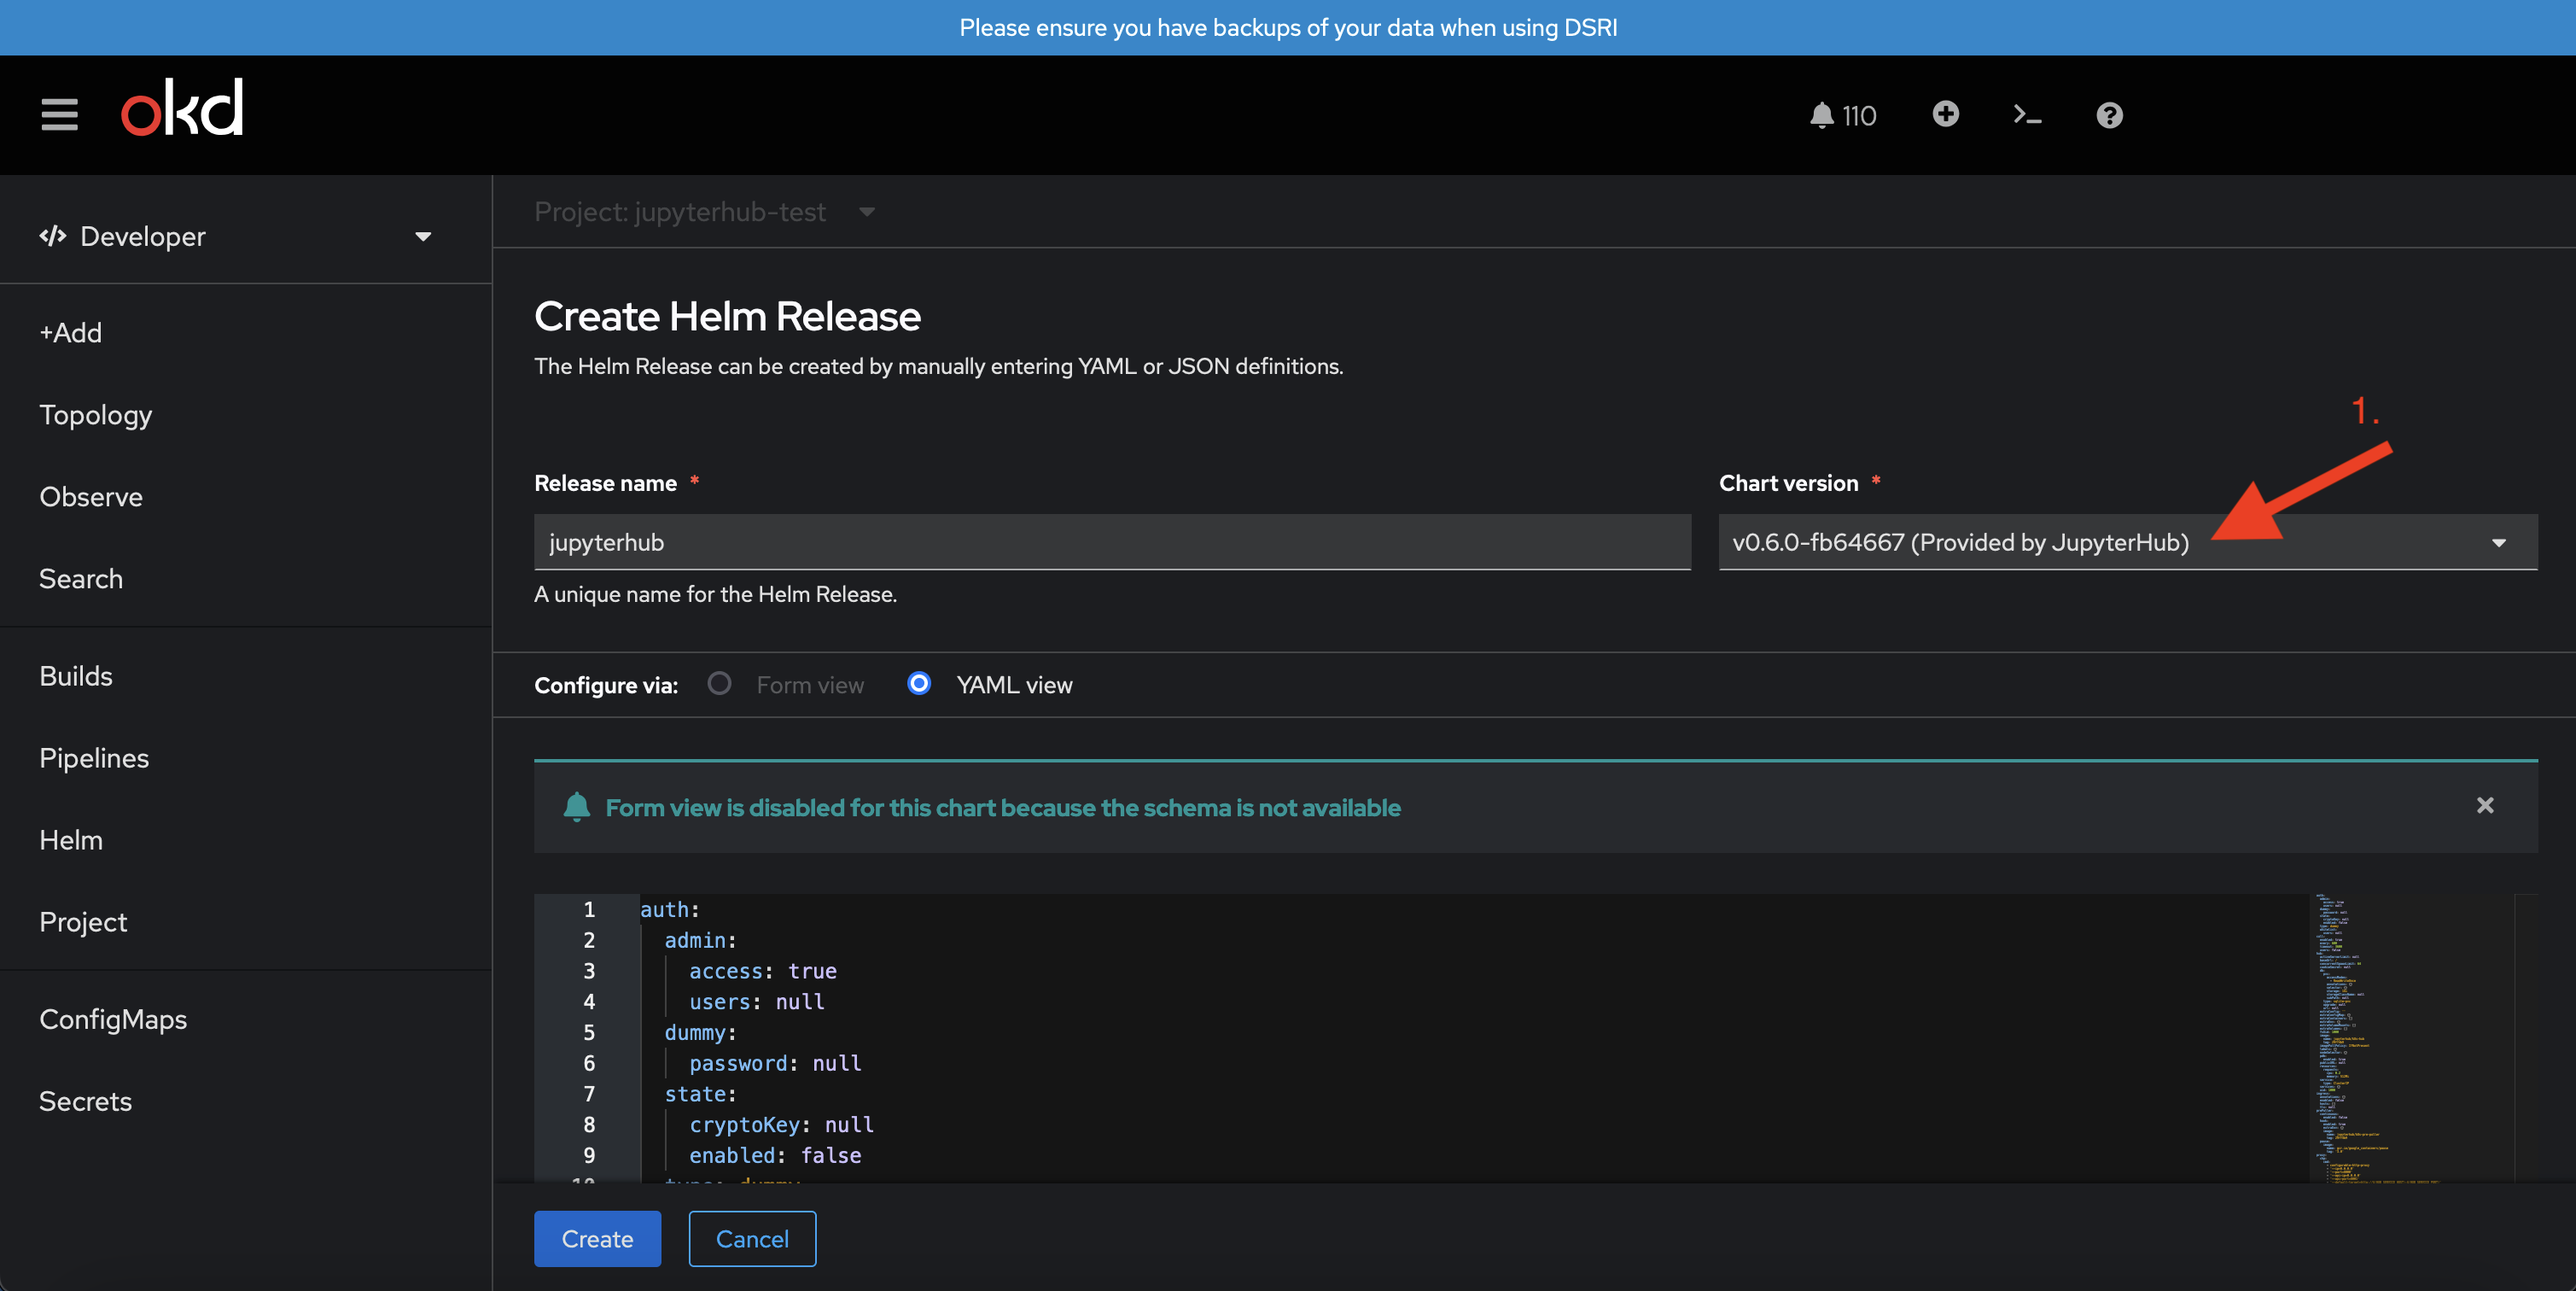
And choose the right Chart version: 3.3.8 (1). Note that this is an important step, as we only support version 3.3.8 at the moment. Newer versions do not work yet and older versions we did not configure and/or test!
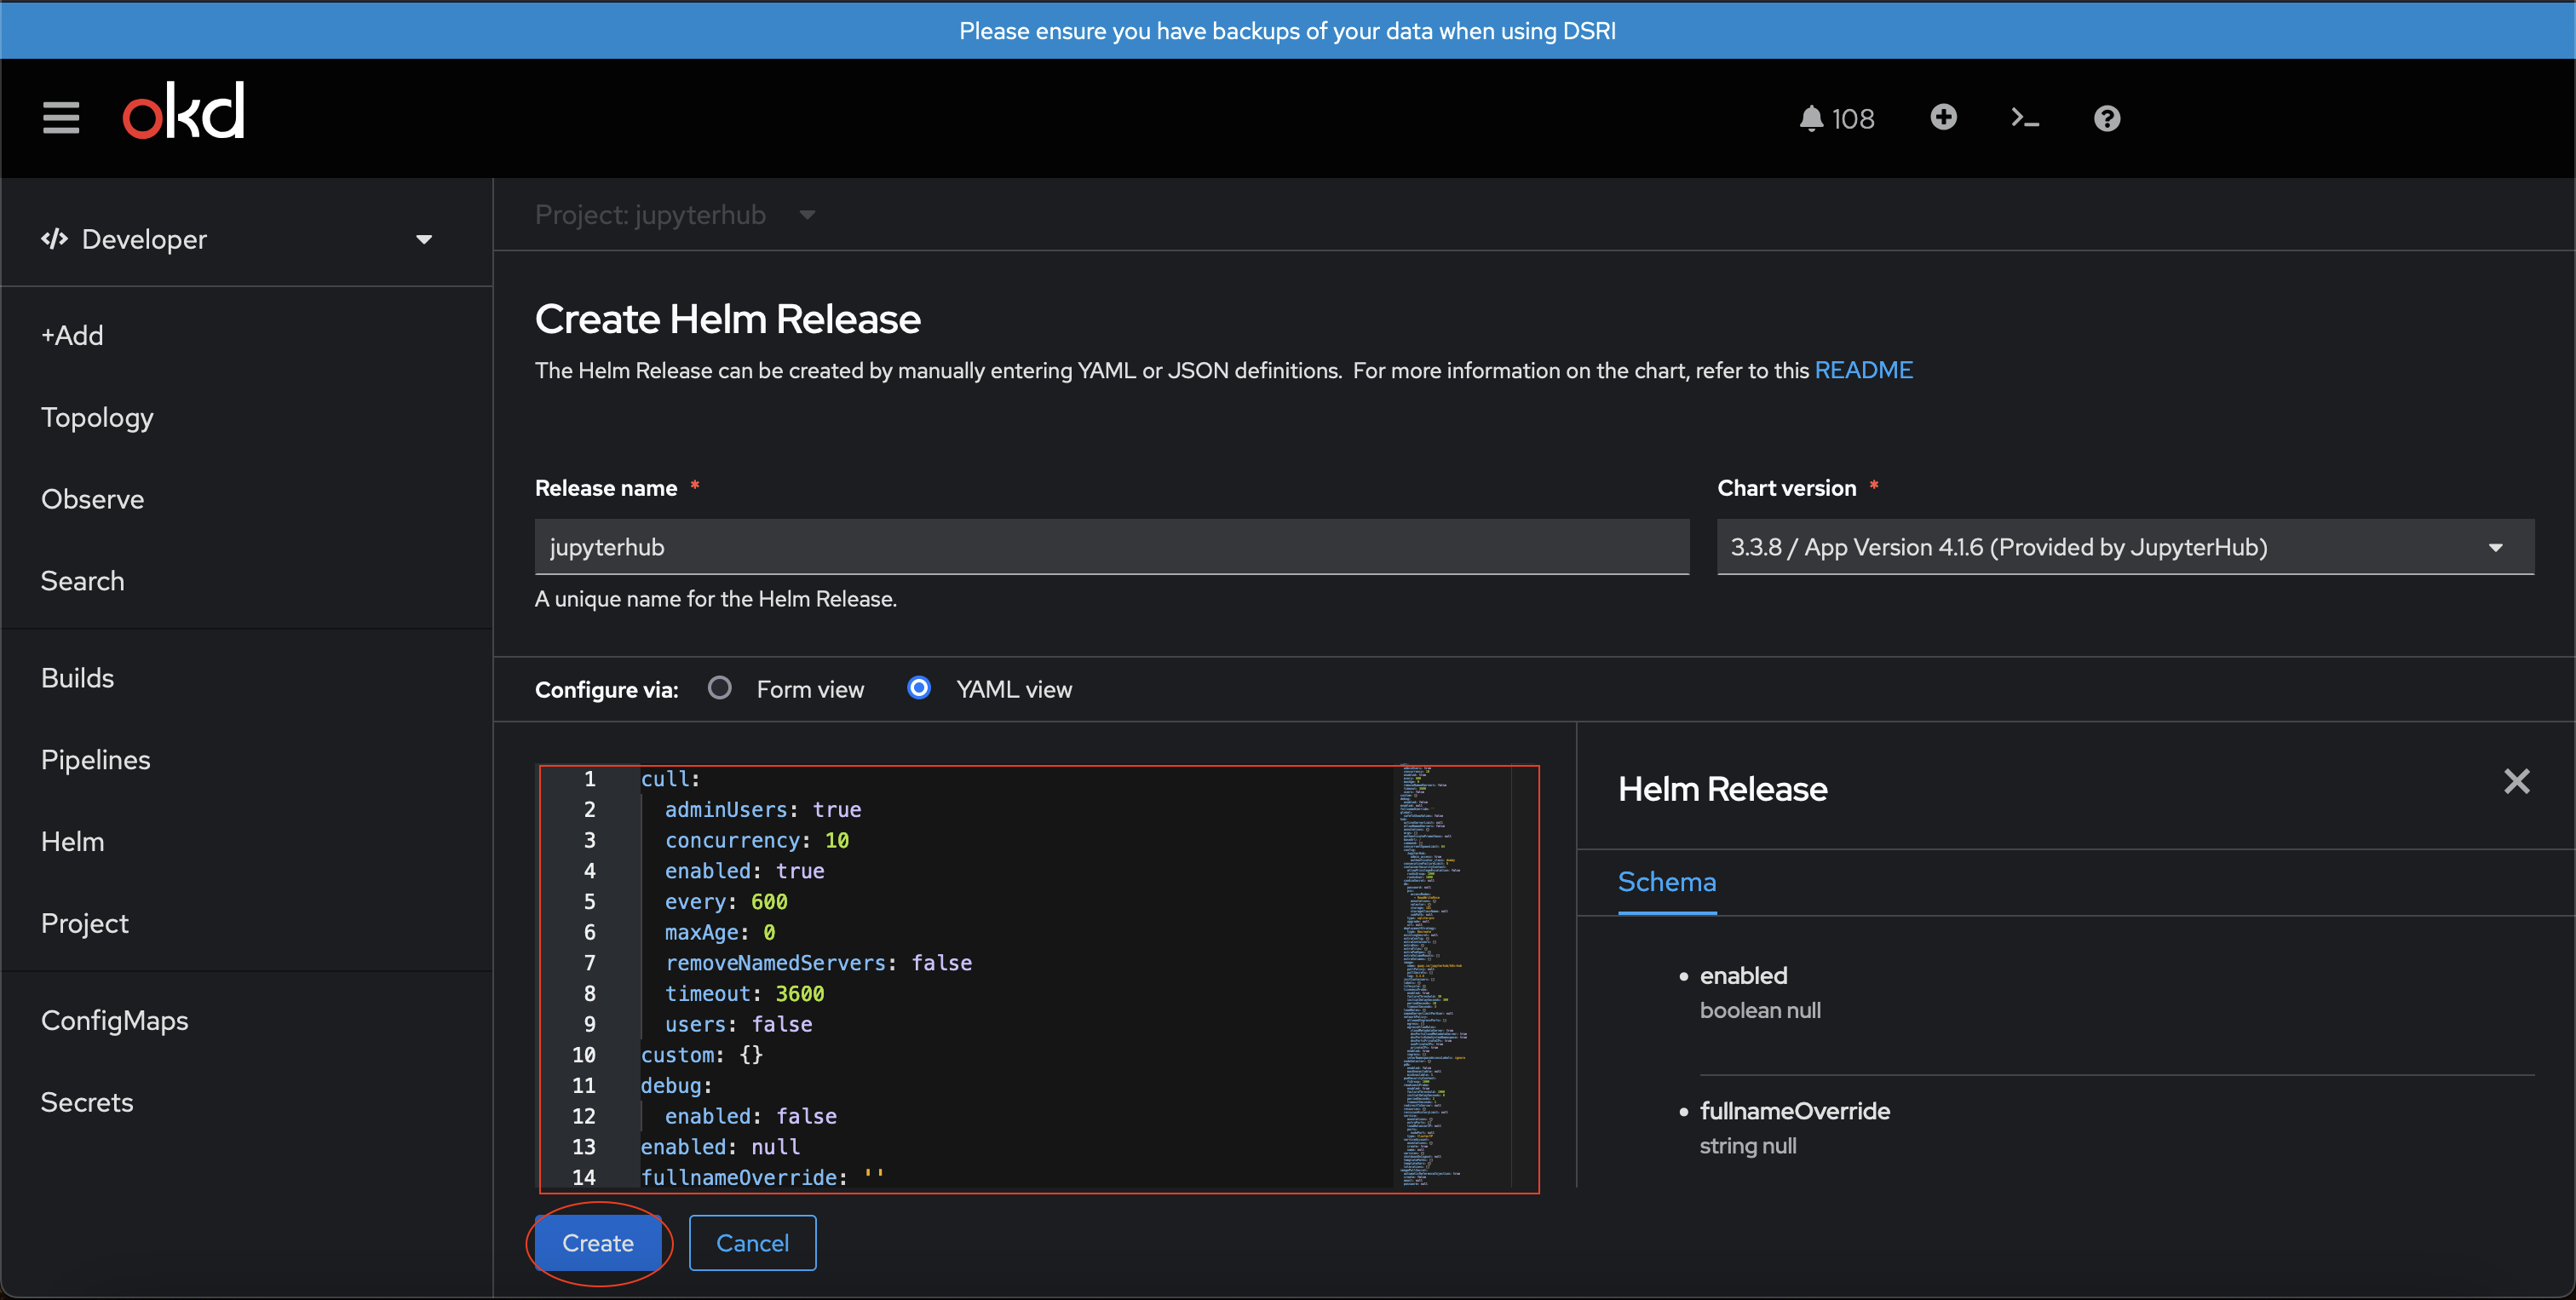
Now, change the config with the content of the config-basic.yaml you have downloaded from our GitHub repository.
Copy the content of the config-basic.yaml and paste it in the highlighted box to replace the old with the new config. Click Create to install the JupyterHub Helm Chart.
Creating a secured route
Create a secured route, with TLS edge termination.
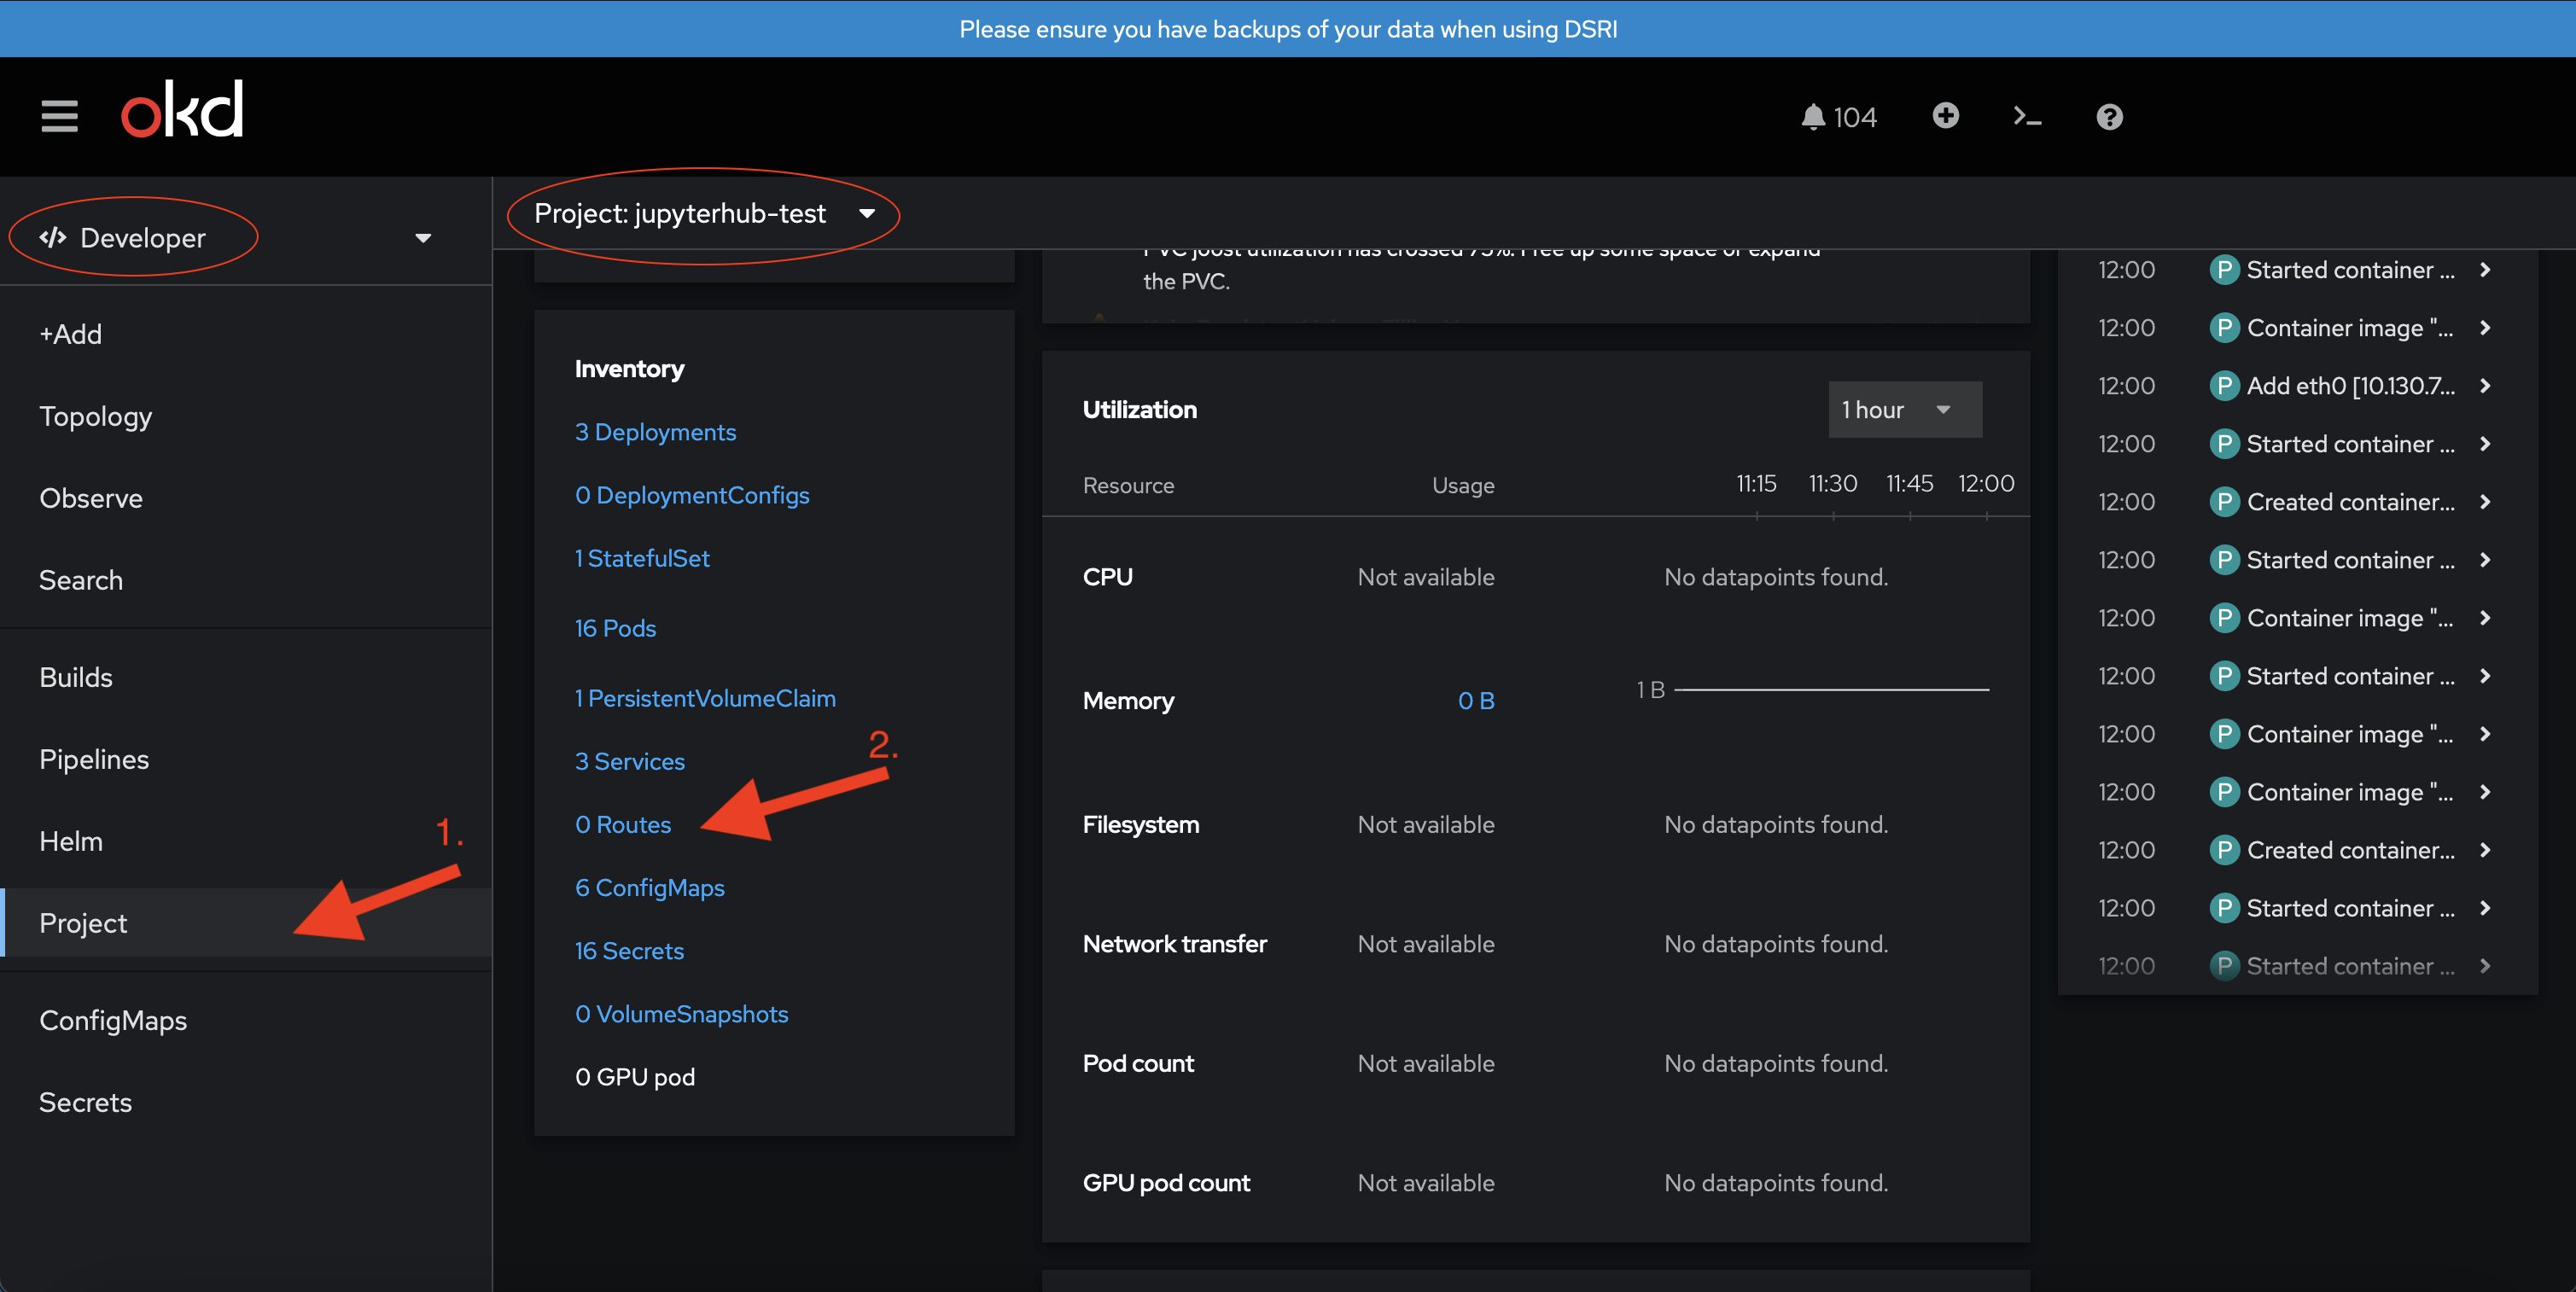
In Developer mode in your project, go to Project in the sidepanel (1). Next, click on Route (2).
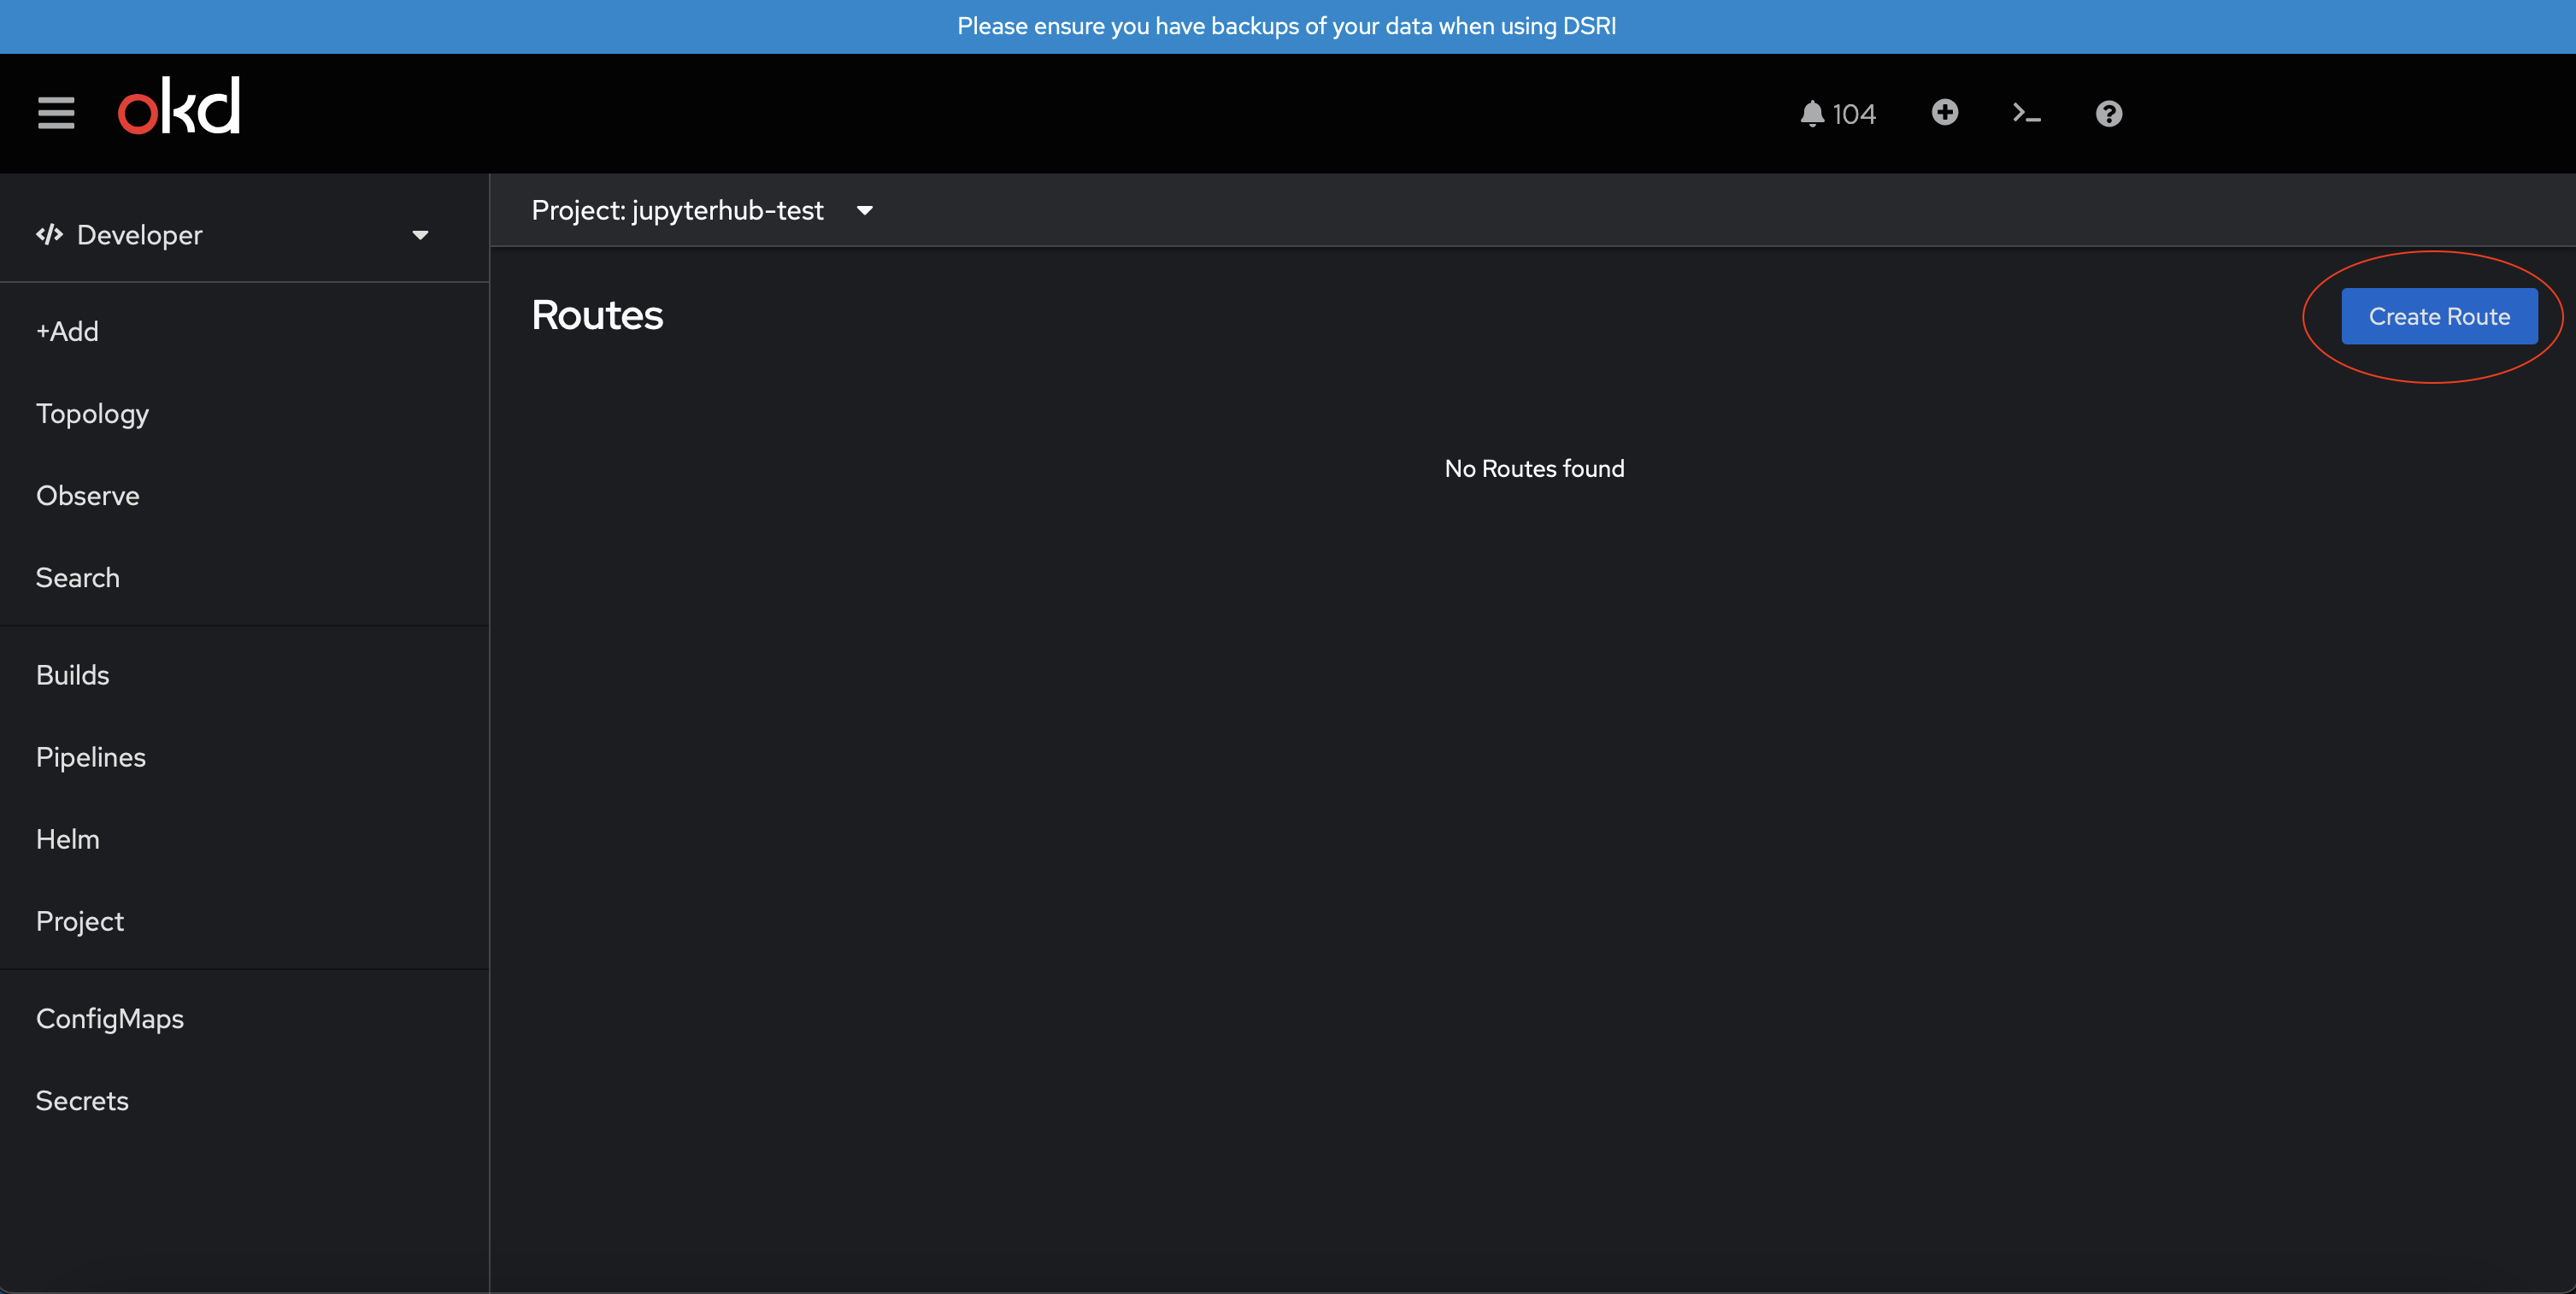
Next, click Create.
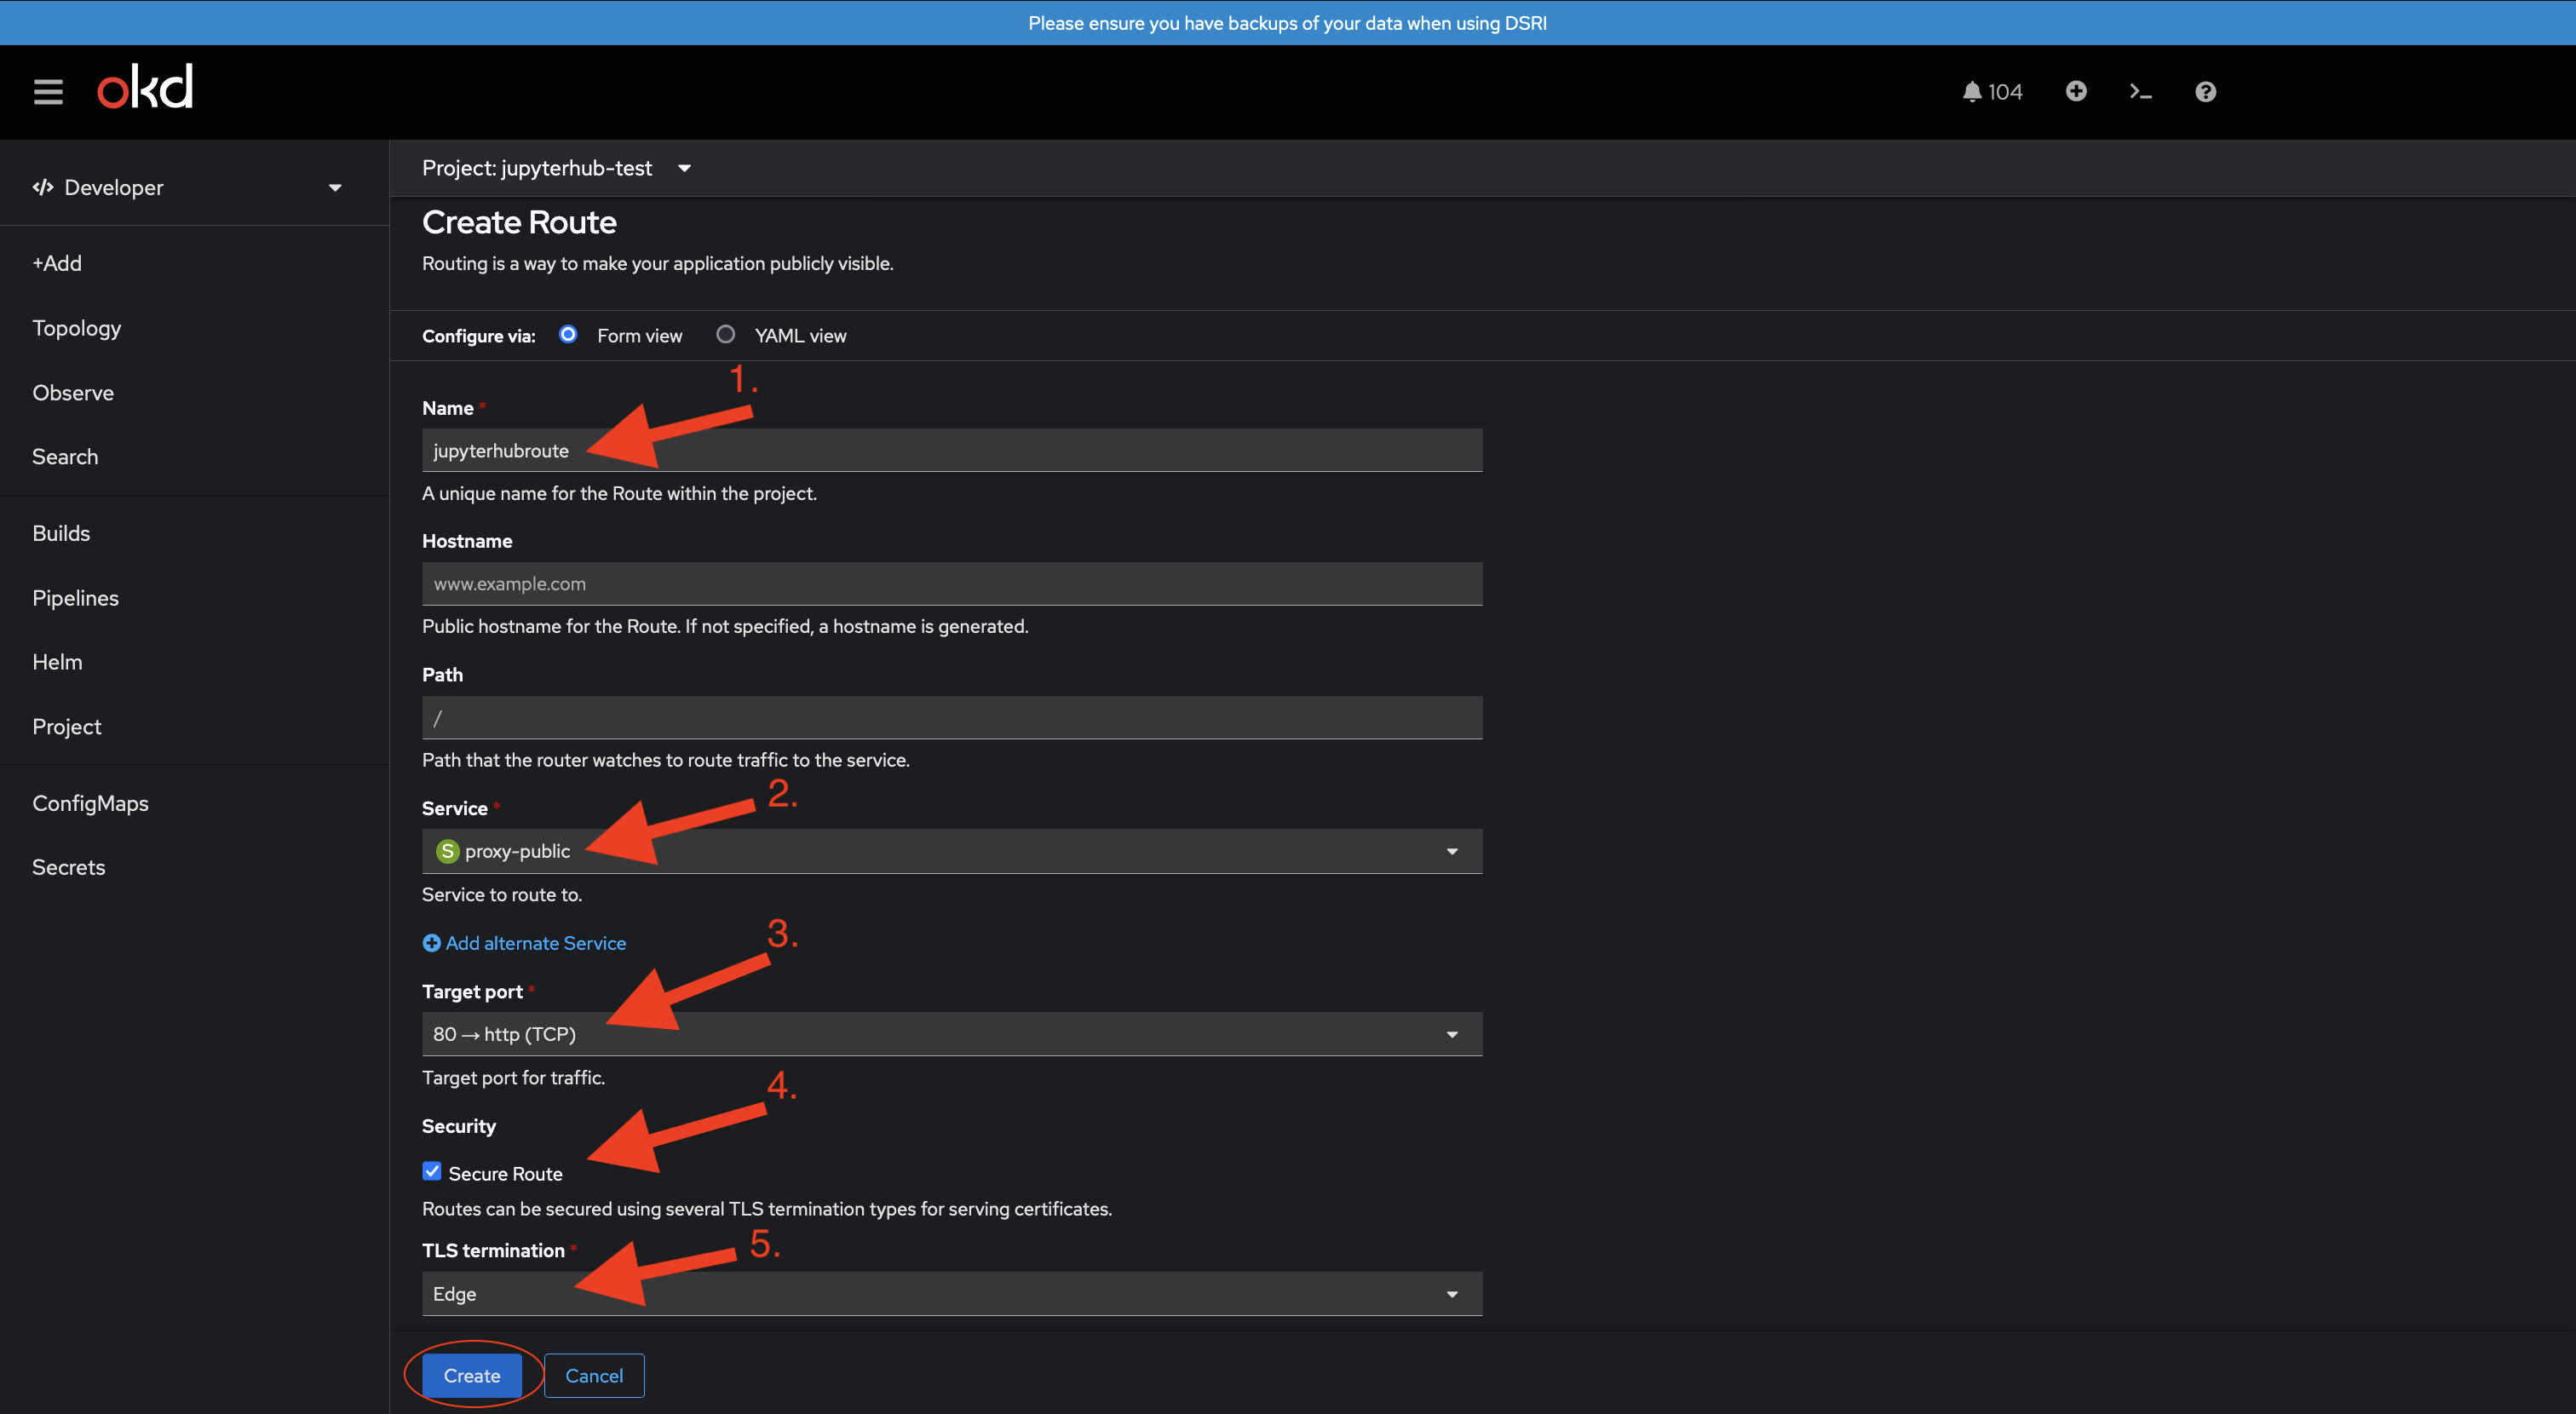
Fill in the Name (1), choose the Service: proxy-public (2), choose the Target Port: 80 -> http (TCP) (3), tick the box Secure Route (4), and finally choose TLS Termination: Edge (5). Next, click Create, to create the route.
Upgrading the config-basic.yaml
You can upgrade your config-basic.yaml easily in the DSRI web UI if you would like to change certain settings, such as user's default persistent volume claims, authentication methods, and many more things. Note that in some cases users who created an account with an old authentication method will still have access via that method, make sure you set up your preferred authentication method before allowing users to authenticate and use the JupyterHub instance.
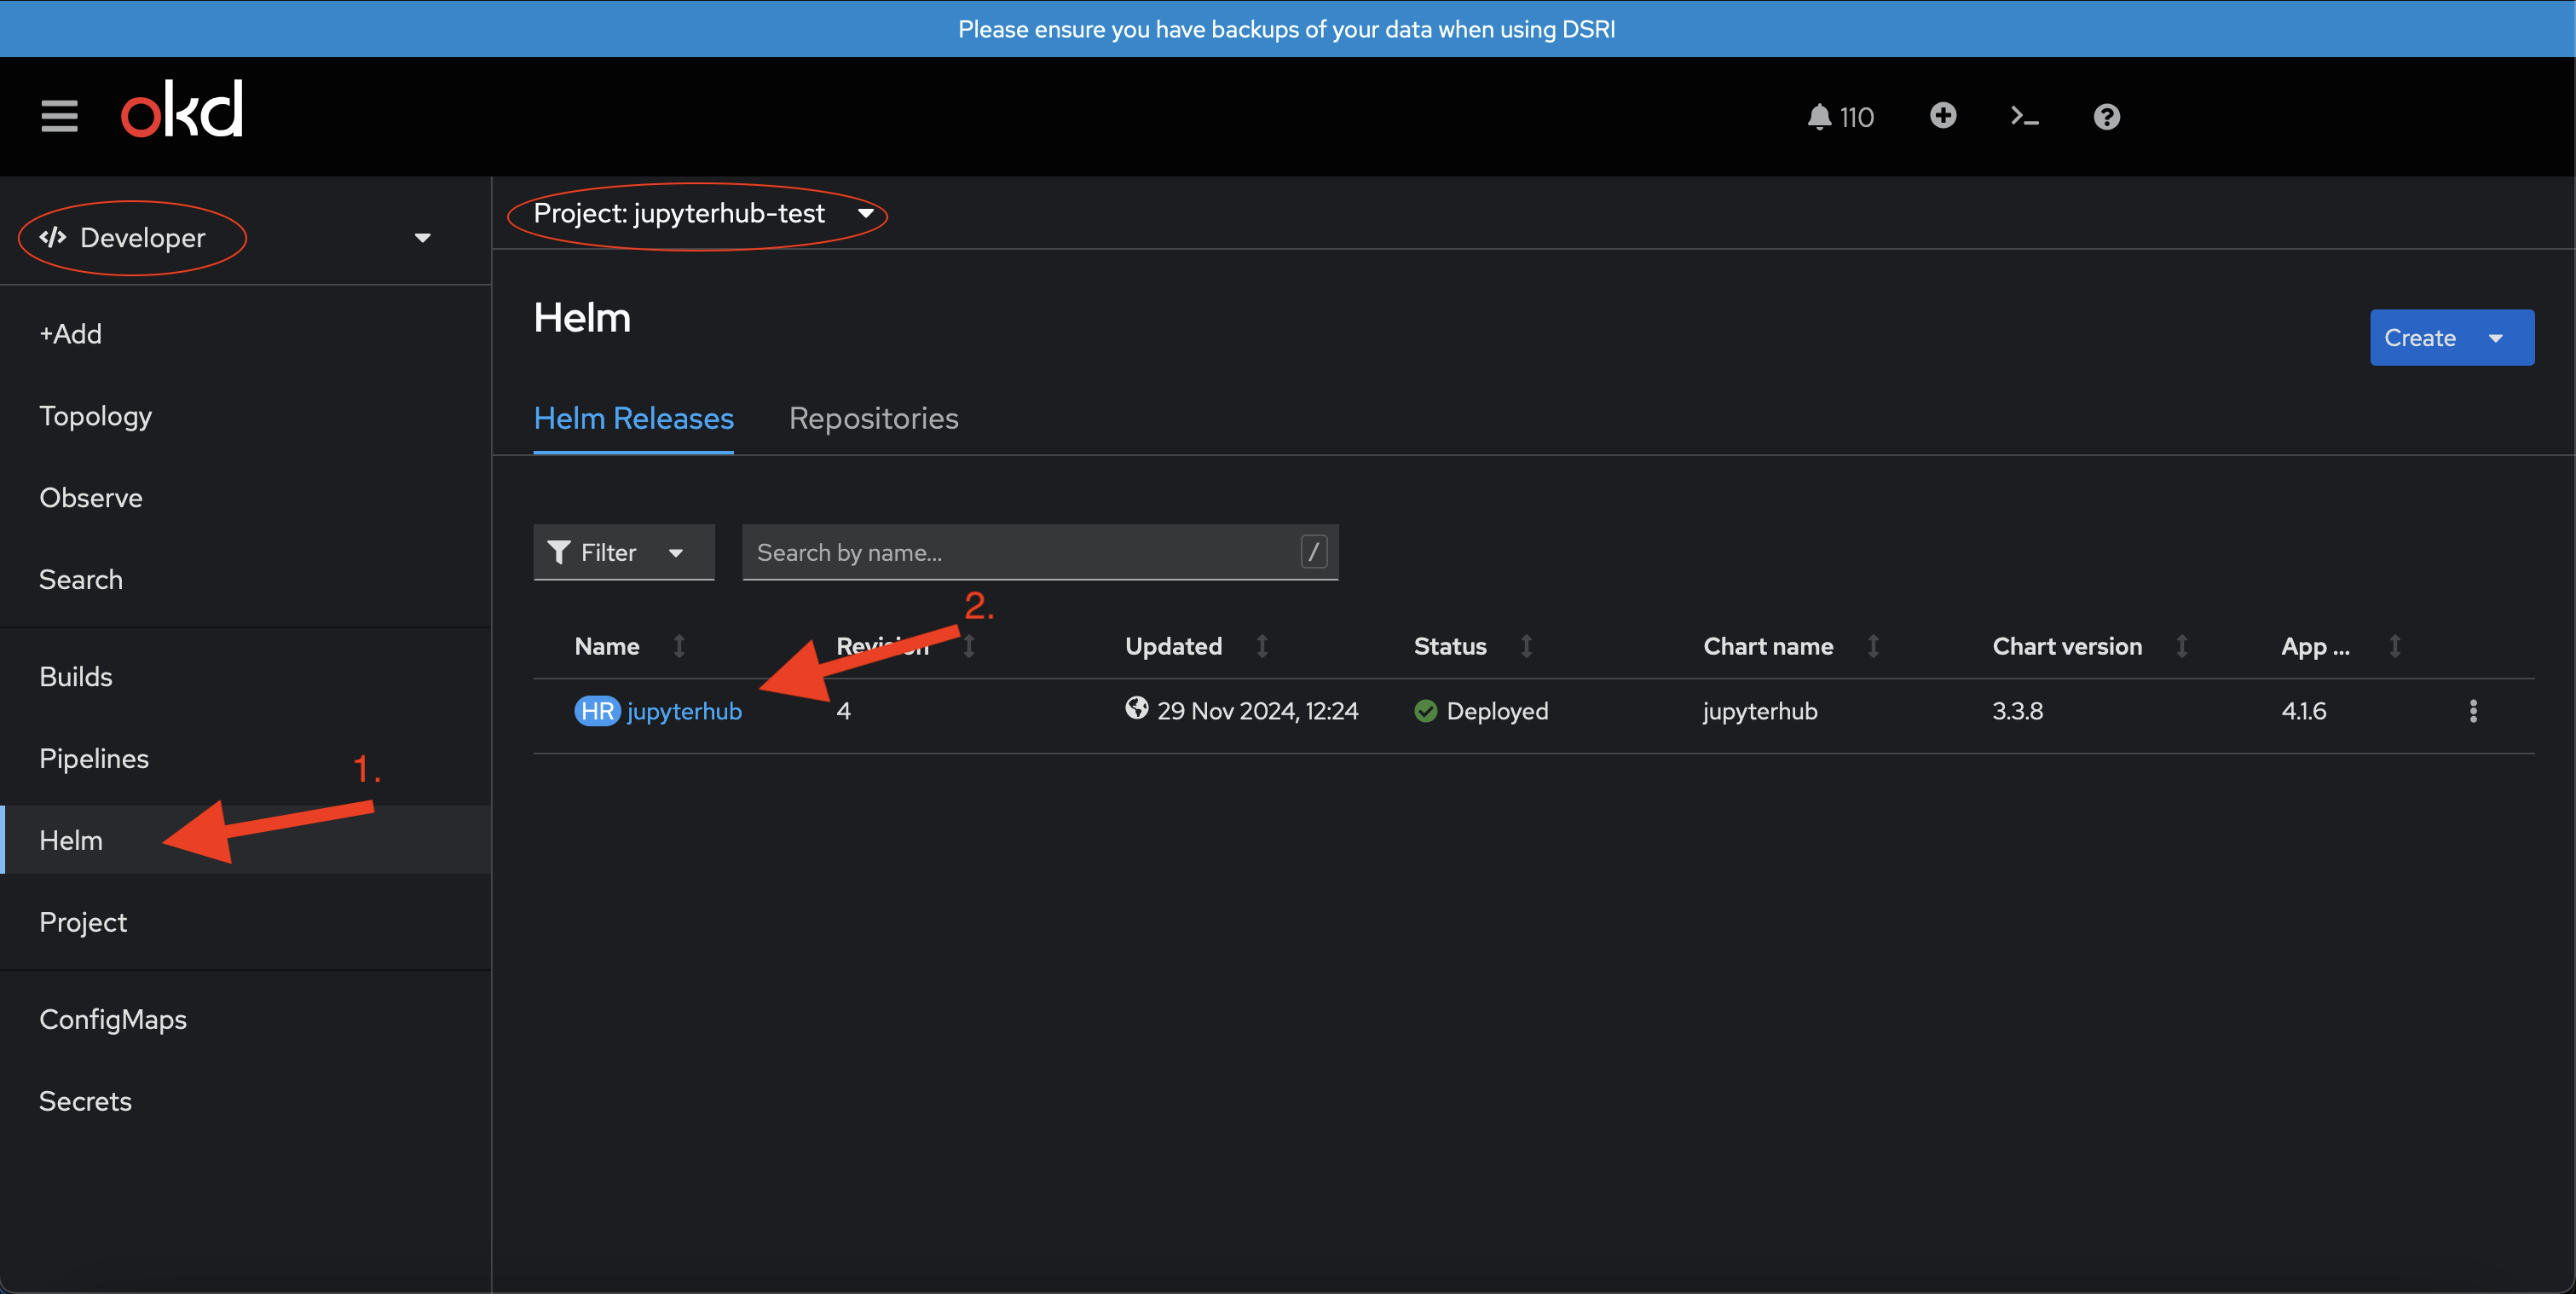
In Developer mode in your project, go to Helm in the sidepanel (1). Next, click on your Helm Chart Release (2).
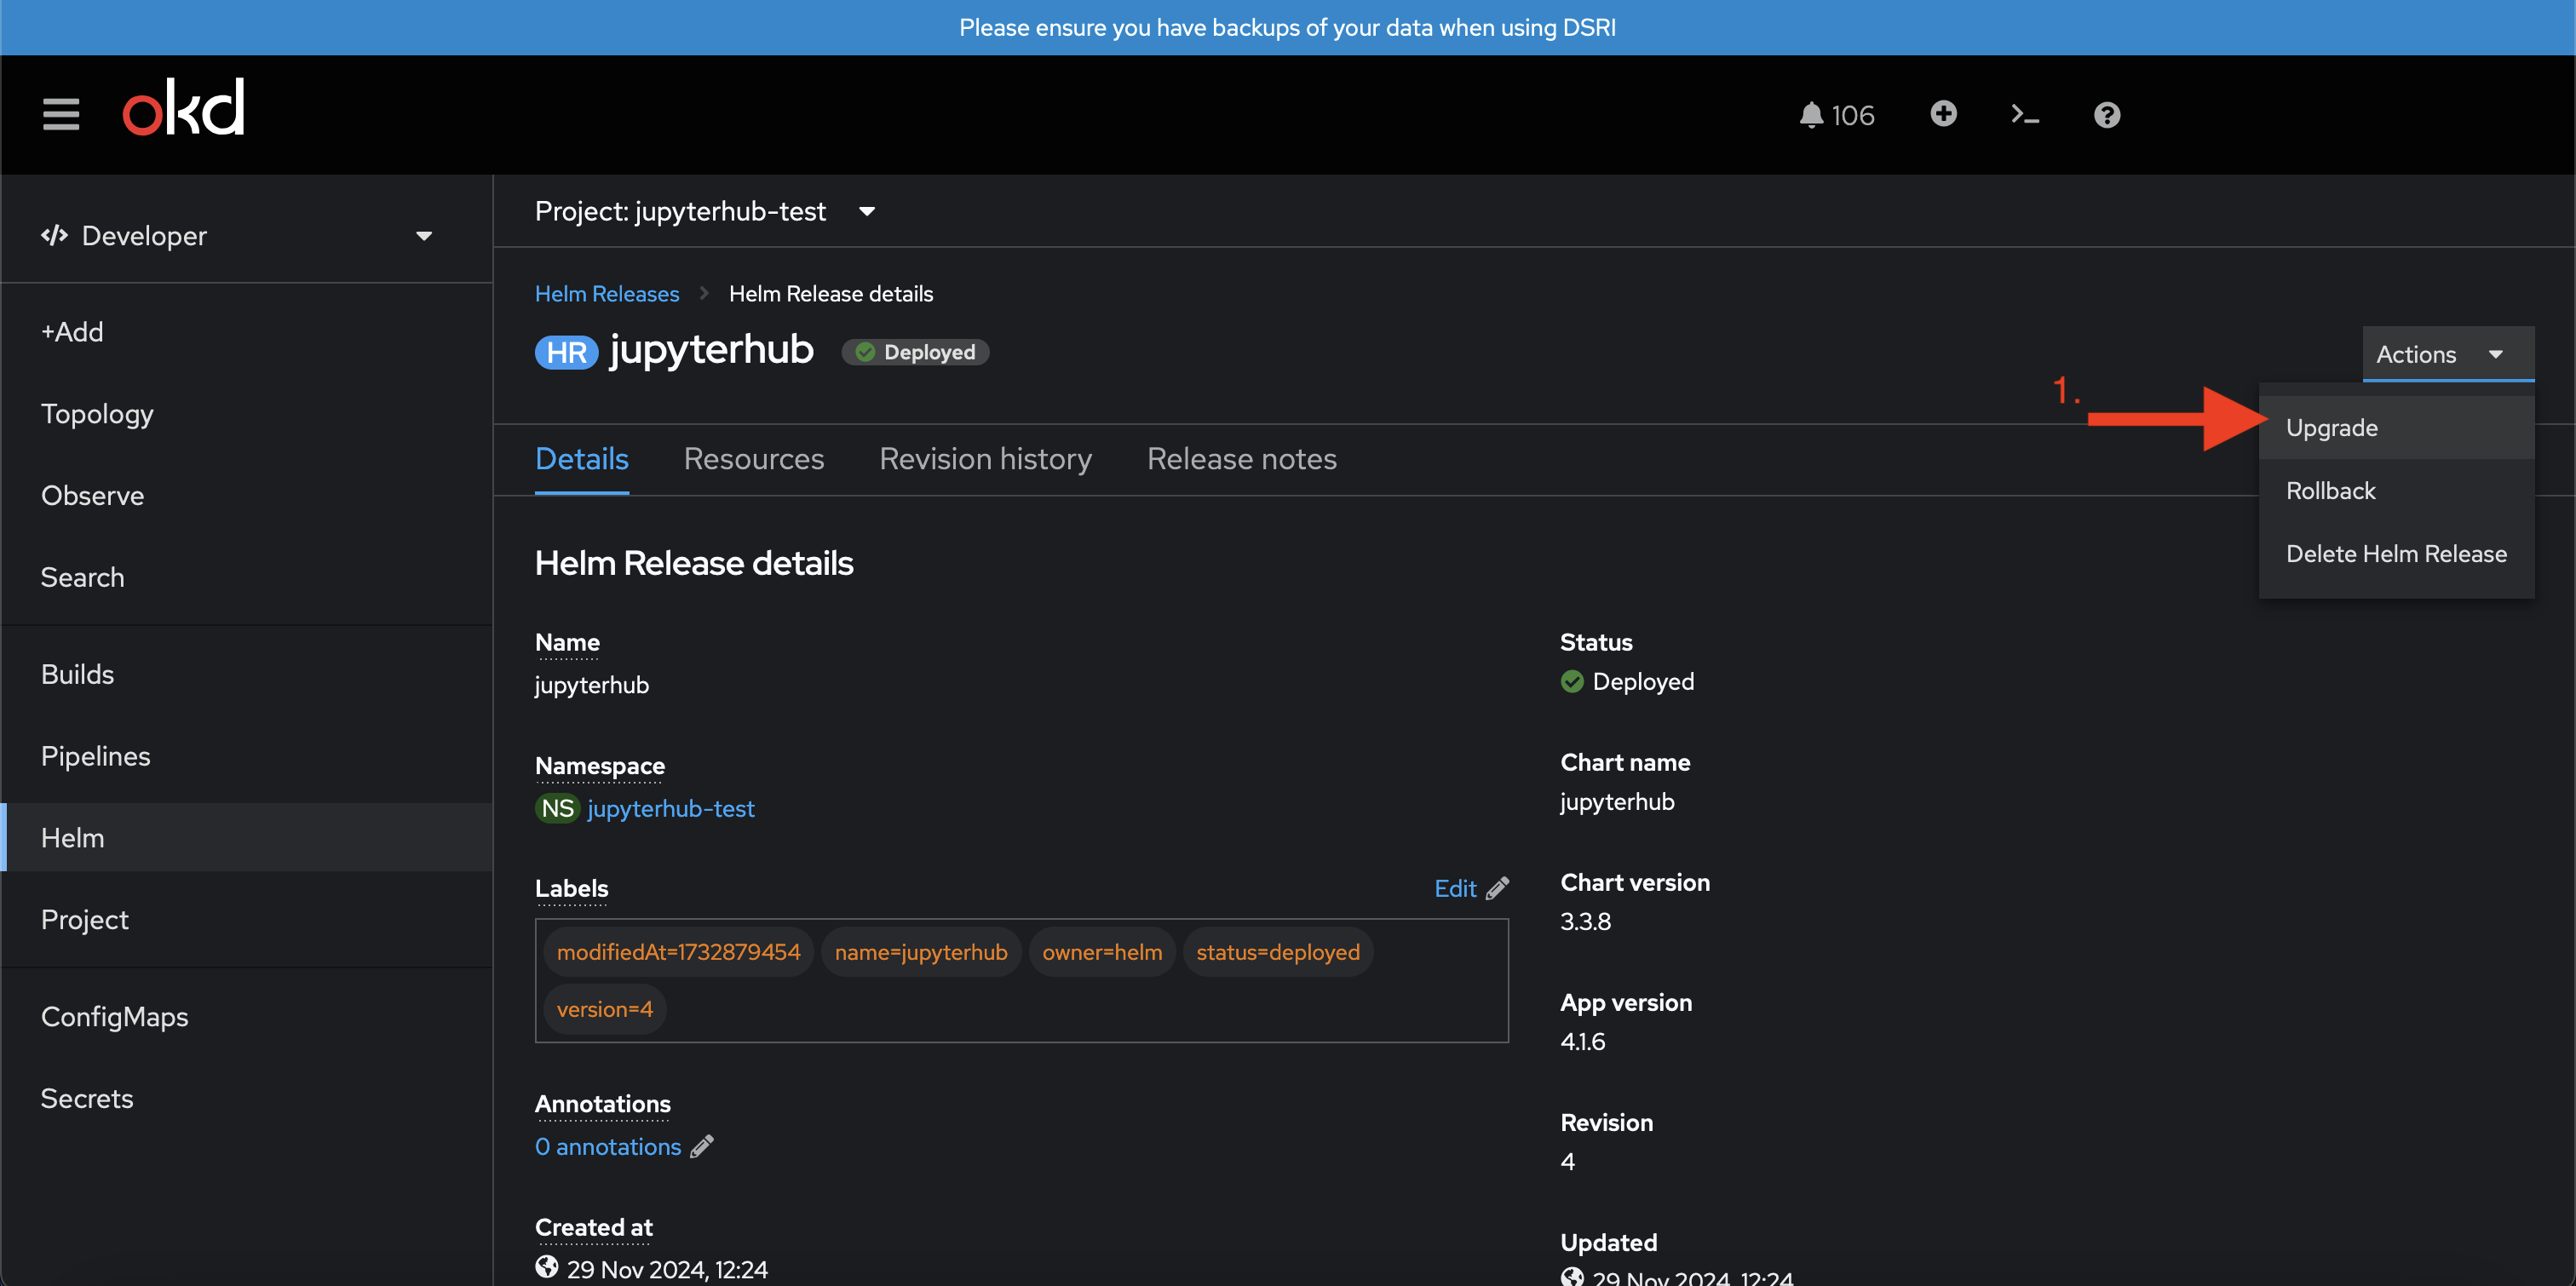
Now, click the Actions drop down menu, and choose Upgrade (1).
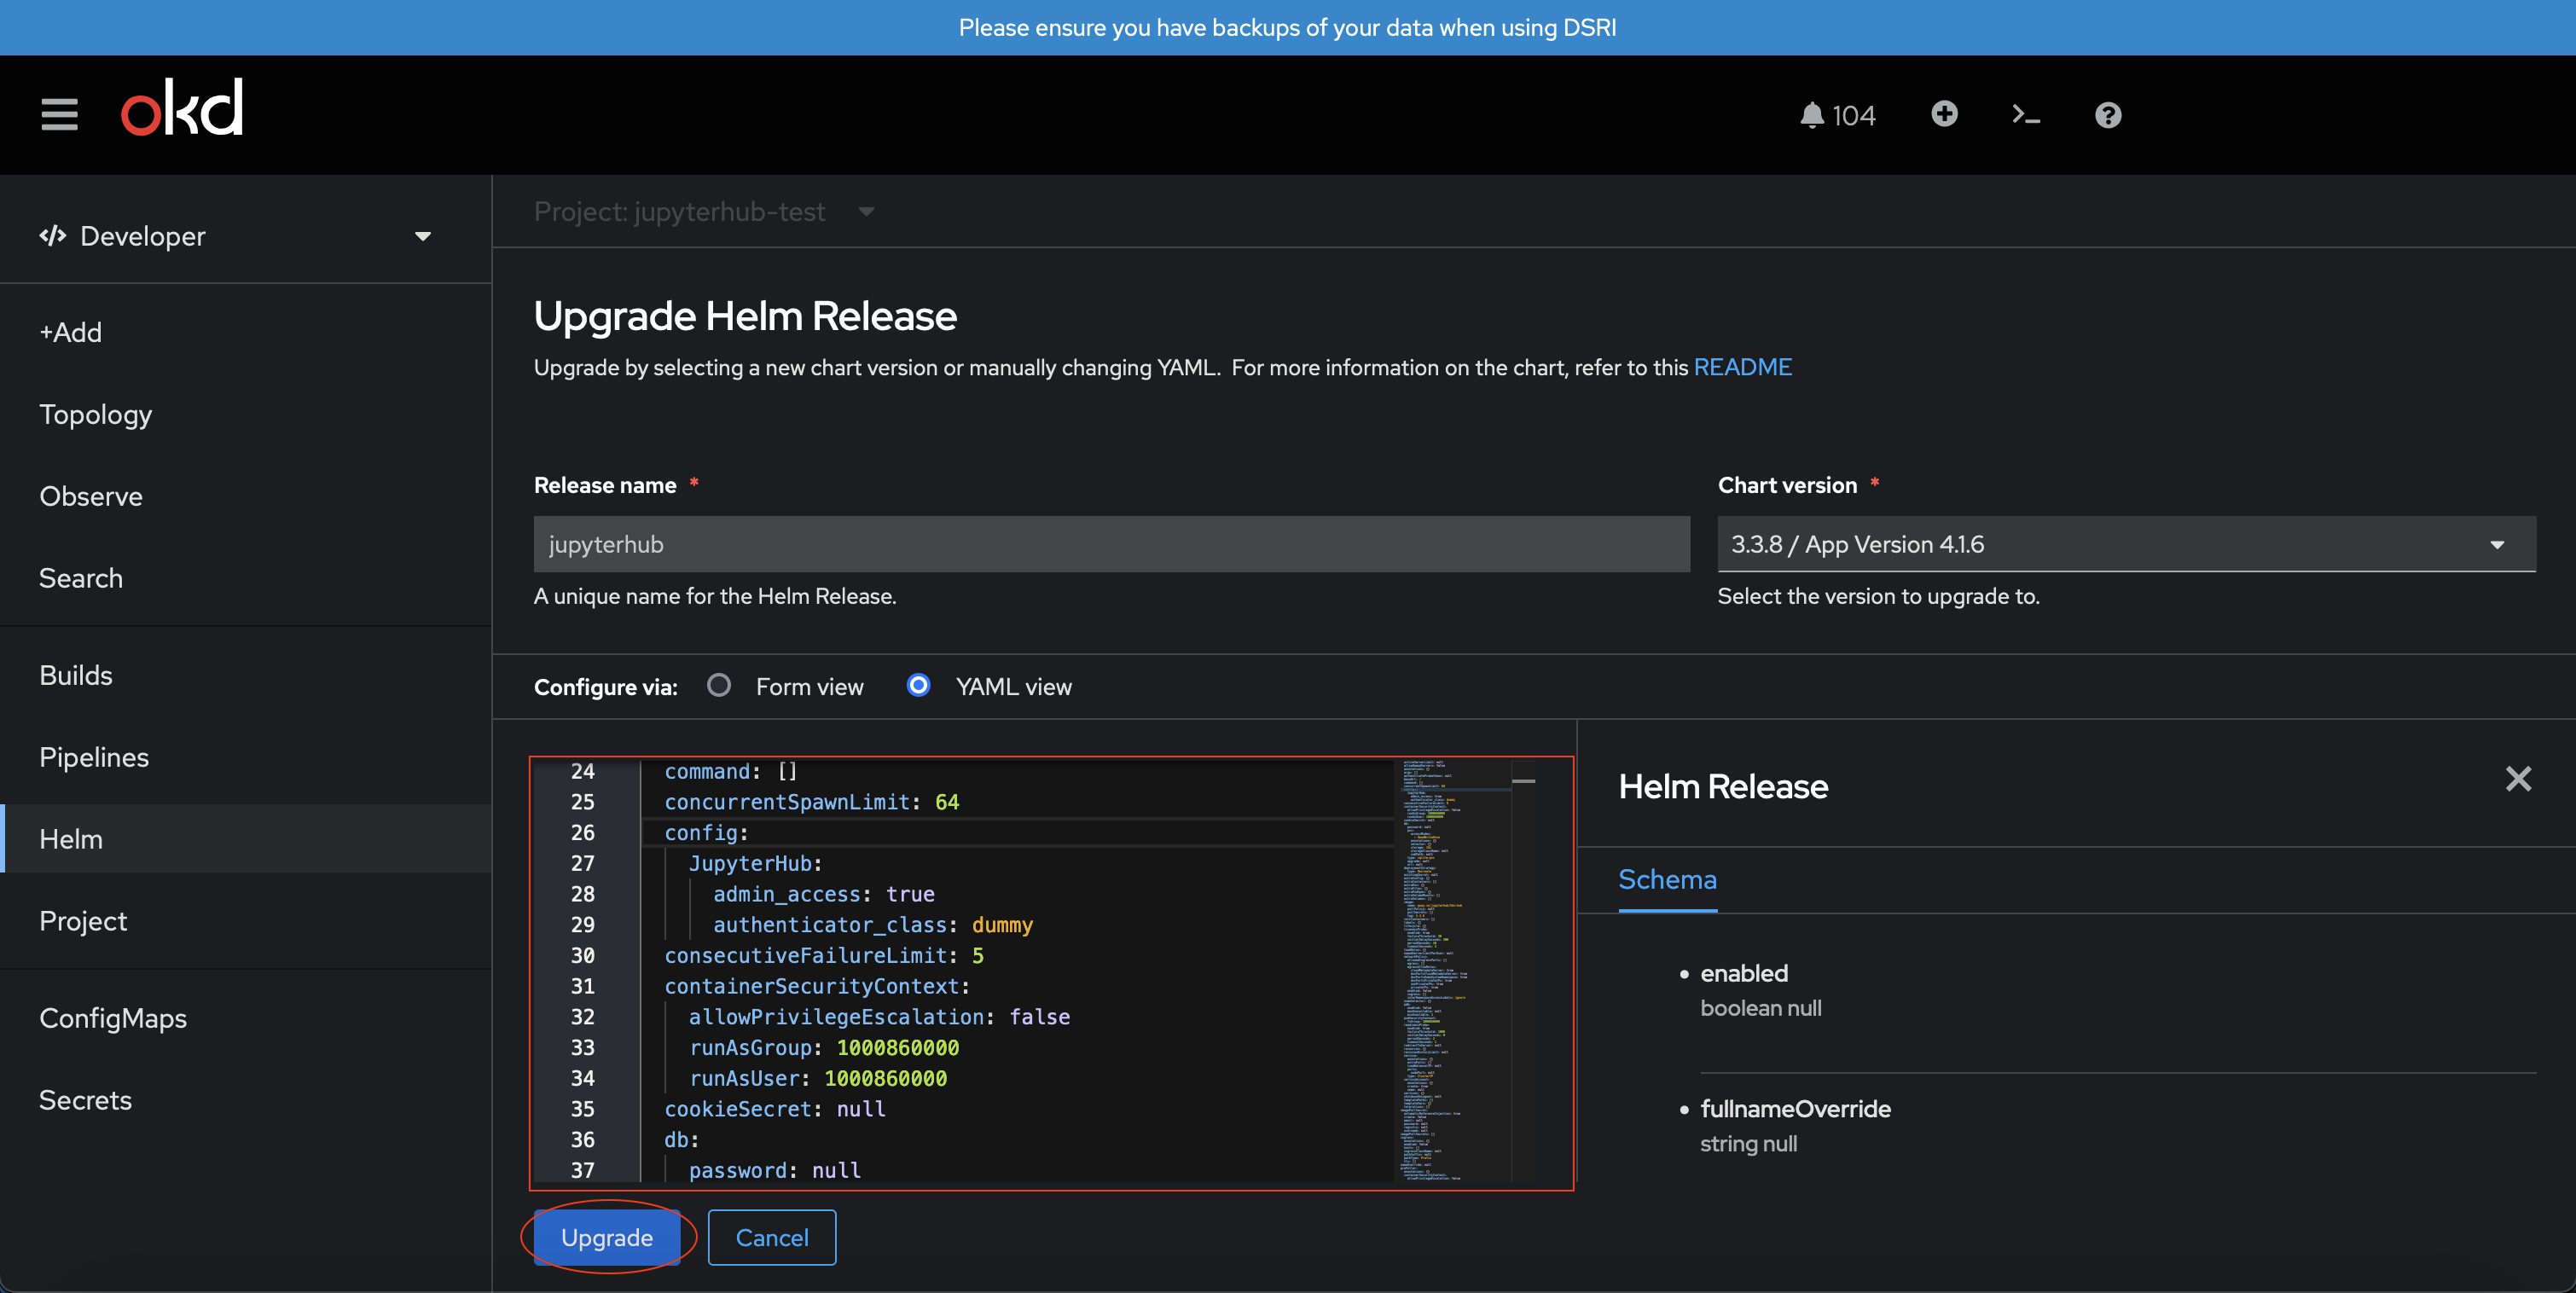
In the box -highlighted in the picutre below- you can make changes to the config-basic.yaml. After you have made your changes, click Upgrade and your upgraded JupyterHub Helm Chart Release will automatically be deployed.
Feel free to submit a ticket to ask for help configuring your JupyterHub.
Deploying JupyterHub using the Command Line Interface (CLI) 🪐
Download the preconfigured config-basic.yaml from our GitHub repository.
The default config that is provided by JupyterHub will not work.
Installing the JupyterHub Helm Chart repository
After you have created a project you can start with installing the JupyterHub Helm Chart. If you do not have access to DSRI or created a project yet, and you need to find out how, please refer to our documentation.
The Helm Chart should be already made available for everyone to use on the DSRI platform. There will be no need to install the repository yourself.
Add the JupyterHub Helm Chart repository:
helm repo add jupyterhub https://hub.jupyter.org/helm-chart/
helm repo update
Installing the JupyterHub Helm Chart
At the moment the latest -and only- Helm Chart version which is supported by DSRI is version 3.3.8. Newer versions will not work, and older versions are not tested and/or configured!
Make sure you use the right config-basic.yaml downloaded from our GitHub repository.
Install the Helm Chart using the following command:
helm upgrade --cleanup-on-fail \
  --install jupyterhub jupyterhub/jupyterhub \
  --version=3.3.8 \
  --namespace=<project name> \
  --values config-basic.yaml
<project name> is the name of your project.
Creating a secured route
Create a secured route, with TLS edge termination:
oc create route edge <NAME OF ROUTE> --namespace <project name> --service=proxy-public --port=http
<project name> is the name of your project.
<NAME OF ROUTE> is the name of the route.
Upgrading the config-basic.yaml
Run the following command with your new config-basic.yaml:
helm upgrade --cleanup-on-fail \
  --install jupyterhub jupyterhub/jupyterhub \
  --version=3.3.8 \
  --namespace=<project name> \
  --values config-basic.yaml
<project name> is the name of your project.
Feel free to submit a ticket to ask for help configuring your JupyterHub.
Connecting to a JupyterHub instance with the API
It is possible to use API calls to interact with your JupyterHub instance. For more information about the JupyterHub API you can find their documentation here.
To make us of the API, first you need to access your personal API token. In your JupyterHub instance, after logging in, click File in the top left corner. Then click Hub Control Panel, and you will navigate to your Hub's control panel. Then click Token in the top navigation bar.
You will navigate to your API token management page. Here you can request a new API token for yourself by clicking the Request new API token button. You can choose to let the API token expire in one hour, one day, one week or to never let the token expire.
Furthermore, you can revoke existing tokens and you can manage authorized applications which are linked via OAuth token to your JupyterHub.
This is an example on how to request all users with the JupyterHub API using the Python programming language:
import requests
import json

api_token = ' <TOKEN>'
api_url = '<URL>/hub/api'

r = requests.get(f'{api_url}/users',
    headers={
        'Authorization': f'token {api_token}',
})

status_code = r.status_code
print('Status code:', status_code)

status = r.raise_for_status()
print('Status:', status)

users = r.json()
print(json.dumps(users, indent=3))
Where <TOKEN> is your API token. And <URL> is your JupyterHub instance's URL.